Introduction
In this tutorial, we will guide you through the process of setting up Firebase Realtime Database in Android Studio for performing CRUD (Create, Read, Update, Delete) operations. Firebase Realtime Database is a powerful tool for creating real-time applications in Android. We’ll cover each step-in detail, making it easy for anyone to follow along.
- Setting Up Firebase
- Setting Up Android Studio
- Setting Up Firebase Realtime Database
- Implementing CRUD Operations
- Step 8: User Input
- why we are use lateinit var in Kotlin?
- When do we use var and val?
- When to Choose var or val in Katlin ?
- Step 9: View Activity
- Step 10: Model Class
- Step 11: XML Layout File
- Step 12: Create Adapter Class
- Step 13: ViewUsers.kt
- Step 14: Update Data
- Step 15: Edit Layout File
- Step 16: Edit Kotlin File
Setting Up Firebase
Step 1: Creating a Firebase Account
If you haven’t already, create a Firebase account. Firebase is a Google product, so you can use your existing Gmail account for login.
Step 2: Connecting Android to Firebase
After creating a Firebase account, you can connect Firebase to your Android project. You can choose to do this manually or automatically. We recommend the manual method, as it provides more control and is compatible with different Android versions.
Step 3: Adding a Firebase Project
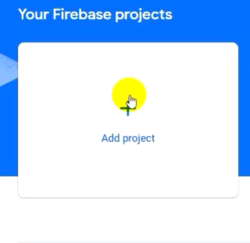
In the Firebase Console, click on “Add Project.” Follow the on-screen instructions, including naming your project, enabling or disabling Google Analytics, and configuring Google Analytics settings.
Setting Up Android Studio
Step 4: Creating an Android Studio Project
Now, let’s create an Android Studio project for your Firebase integration.
Step 5: Firebase Dashboard Integration
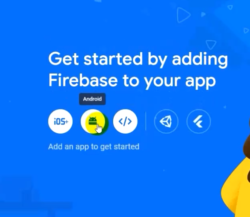
After creating the project in Android Studio, return to the Firebase dashboard. You can see an overview of your project and different icons for various platforms. Select the Android icon to proceed.
Step 6: Adding Firebase to Your Android App
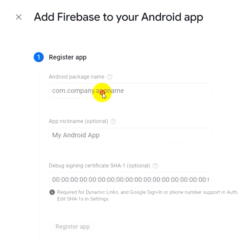
Now, we’ll add Firebase to your Android project. Register your app with Firebase by providing package name, app nickname (optional), and debug signing certificate SHA-1 (optional). Download the `google-services.json` file and add it to your Android Studio project. Add the required dependencies to your project.
Setting Up Firebase Realtime Database
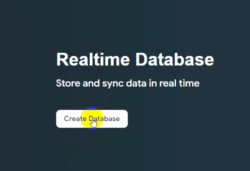
Step 7: Creating a Realtime Database
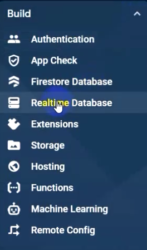
In the Firebase console, select “Firebase Realtime Database” from the left-side panel. Click on “Create Database” and configure its location. Choose between “Start with lock mode” and “Start in test mode” based on your needs. Click “Enable” to create the database. Set database rules.
Implementing CRUD Operations
With the setup complete, you can now start writing code in Android Studio to implement CRUD operations.
Step 8: User Input
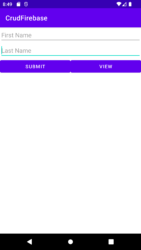
Create a user interface for inputting user data, such as first name and last name.
activity_main.xml
<?xml version="1.0" encoding="utf-8"?>
<LinearLayout xmlns:android="http://schemas.android.com/apk/res/android"
    xmlns:app="http://schemas.android.com/apk/res-auto"
    xmlns:tools="http://schemas.android.com/tools"
    android:layout_width="match_parent"
    android:layout_height="match_parent"
    android:orientation="vertical"
    tools:context=".MainActivity" >

    <EditText
        android:id="@+id/firstname"
        android:layout_width="match_parent"
        android:layout_height="wrap_content"
        android:ems="10"
        android:inputType="textPersonName"
        android:hint="First Name" />

    <EditText
        android:id="@+id/lastname"
        android:layout_width="match_parent"
        android:layout_height="wrap_content"
        android:ems="10"
        android:inputType="textPersonName"
        android:hint="Last Name" />
    <LinearLayout
        android:layout_width="match_parent"
        android:layout_height="match_parent">
    <Button
        android:id="@+id/submit"
        android:layout_width="0dp"
        android:layout_weight="1"
        android:layout_height="wrap_content"
        android:text="Submit" />
        <Button
            android:id="@+id/view"
            android:layout_width="0dp"
            android:layout_weight="1"
            android:layout_height="wrap_content"
            android:text="View" />
    </LinearLayout>
</LinearLayout>
Now, Go to MainActivity
MainActivity.kt
class MainActivity : AppCompatActivity() {
    private lateinit var fname:EditText
    private lateinit var lname:EditText
    private lateinit var submit:Button
    private lateinit var view:Button
    //delcare firebase variable
    private lateinit var database :FirebaseDatabase
    private lateinit var refe:DatabaseReference
    override fun onCreate(savedInstanceState: Bundle?) {
        super.onCreate(savedInstanceState)
        setContentView(R.layout.activity_main)
        //initiallize id
        initializeId()
        //handle firebase database
        FirebaseDb()
        //handle submit button click
        submitBtn()
        //handle view button click
        viewData()
    }

    private fun viewData() {
        view.setOnClickListener {
            // Check if the device is connected to the internet
            if (isInternetConnected()) {
                val intent = Intent(this@MainActivity, ViewUsers::class.java)
                startActivity(intent)
            }else{
                // Internet is not connected, show a message to the user
                Toast.makeText(this@MainActivity," Internet is not connected",Toast.LENGTH_SHORT).show()
            }
        }
    }

    private fun isInternetConnected(): Boolean {
        val connectivityManager = getSystemService(Context.CONNECTIVITY_SERVICE) as ConnectivityManager
        val networkInfo = connectivityManager.activeNetworkInfo
        return networkInfo != null && networkInfo.isConnected

    }

    private fun submitBtn() {
        submit.setOnClickListener {
//            FirebaseDb()
            //get value from edittext
            val efname = fname.text.toString()
            val elname = lname.text.toString()
            //add data to firebase
            val adduser = refe.push()
            adduser.child("firstName").setValue(efname)
            adduser.child("lastName").setValue(elname).addOnCompleteListener { task ->
                if (task.isSuccessful) {
                    // Data submitted successfully, show a success toast message
                    Toast.makeText(
                        this@MainActivity,
                        "Data submitted successfully",
                        Toast.LENGTH_SHORT
                    ).show()

                    // Clear EditText fields or perform any other necessary actions
                    fname.text.clear()
                    lname.text.clear()
                } else {
                    // Error occurred while submitting data, show an error toast message
                    Toast.makeText(this@MainActivity, "Error submitting data", Toast.LENGTH_SHORT)
                        .show()
                }
            }
        }
    }

    private fun FirebaseDb() {
        database=FirebaseDatabase.getInstance()
        refe=database.getReference("users")
    }

    private fun initializeId() {
        fname=findViewById(R.id.firstname)
        lname=findViewById(R.id.lastname)
        submit=findViewById(R.id.submit)
        view=findViewById(R.id.view)
    }
}
Code Explanation
why we are use lateinit var in Kotlin?
In Kotlin, lateinit var is used to declare properties that will be initialized at a later point in the code. It’s particularly useful for Android development and other scenarios where you can’t initialize a property immediately in the constructor or when the property needs to be initialized asynchronously.
Declaring a property as lateinit var means that you promise to initialize it before using it. It’s treated as non-nullable, meaning you don’t need to handle nullability checks every time you use the property, unlike properties declared as nullable (e.g., var x: SomeType? = null). This can lead to cleaner and more concise code when you’re sure the property will be initialized.
It’s typically used for mutable properties (var) rather than immutable properties (val) since immutable properties should ideally be initialized in the constructor.
Firebase Initialization: It calls the FirebaseDb function to initialize Firebase. This includes initializing the Firebase database and creating a reference to the “users” node in that database.
Submit Button Click Handling: The submitBtn function is responsible for handling the click event of the “Submit” button. When the button is clicked, this function does the following:
Retrieves the values entered into the EditText fields for first name (fname) and last name (lname). Adds a new user to the Firebase database under the “users” node with the first name and last name values.
Uses addOnCompleteListener to handle the completion of the database operation. If the data submission is successful, it displays a success toast message and clears the EditText fields. If there’s an error, it displays an error toast message.
When do we use var and val?
In Kotlin, var and val are used to declare variables, but they have different characteristics based on mutability:
var (Mutable Variable):Variables declared with var are mutable, which means you can change their values after they are assigned.
val (Immutable Variable):Variables declared with val are immutable, which means you cannot change their values once they are assigned.
They are similar to constants or final variables in other languages.
You use val when you expect the value of the variable to remain constant throughout its scope.
When to Choose var or val in Katlin ?
Use var when you need to change the value of a variable during its scope. This is suitable for variables that represent changing data, like counters, loop variables, or user input that may change over time. Use val when you want to declare constants or when you don’t need to change the value of the variable. This is preferred for most variables because it helps prevent accidental changes to data, enhances code safety, and makes your code more predictable and easier to reason about.
View Button Click Handling: The viewData function handles the click event of the “View” button. When clicked, it checks whether the device is connected to the internet using the isInternetConnected function. If connected, it starts a new activity (ViewUsers) to view user data. If not connected, it shows a toast message indicating that there is no internet connection.
Internet Connectivity Check: The isInternetConnected function checks whether the device has an active internet connection. It uses the ConnectivityManager to determine if there is an active network connection.
Firebase Database Initialization: The FirebaseDb function initializes the Firebase database by getting an instance of FirebaseDatabase and creating a reference to the “users” node in the database.
Initialization: The initializeId function is used to find and initialize the UI components by their resource IDs.
Step 9: View Activity
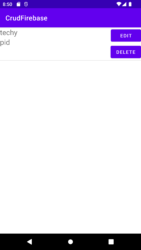
Create a new empty activity to display user data in a ListView.
Step 10: Model Class
Before coding to view data, create a model class to represent the data structure.
Model.kt
class Model():Parcelable {
     var keyId:String?=null
    var firstName:String?=null
    var lastName:String?=null

    constructor(parcel: Parcel) : this() {
        keyId = parcel.readString()
        firstName = parcel.readString()
        lastName = parcel.readString()
    }

    //generate constructor
    constructor(keyId: String?, firstName: String?, lastName: String?) : this() {
        this.keyId = keyId
        this.firstName = firstName
        this.lastName = lastName
    }

    override fun writeToParcel(parcel: Parcel, flags: Int) {
        parcel.writeString(keyId)
        parcel.writeString(firstName)
        parcel.writeString(lastName)
    }

    override fun describeContents(): Int {
        return 0
    }

    companion object CREATOR : Parcelable.Creator<Model> {
        override fun createFromParcel(parcel: Parcel): Model {
            return Model(parcel)
        }

        override fun newArray(size: Int): Array<Model?> {
            return arrayOfNulls(size)
        }
    }
}
Code Explanation
Class Declaration
class Model(): Parcelable {
This declares a class named Model that implements the Parcelable interface.
Properties
var keyId: String? = null
   var firstName: String? = null
   var lastName: String? = null
These are properties (fields) of the Model class. They represent data associated with an instance of this class. They are declared as nullable strings (String?) and initialized with null.
Primary Constructor
 constructor(keyId: String?, firstName: String?, lastName: String?) : this() {
       this.keyId = keyId
       this.firstName = firstName
       this.lastName = lastName
   }
This is the primary constructor of the Model class. It takes three parameters (keyId, firstName, and lastName) that are used to initialize the properties of the class. The : this() part calls the no-argument constructor to ensure that any additional setup is performed.
Secondary Constructor
 constructor(parcel: Parcel) : this() {
       keyId = parcel.readString()
       firstName = parcel.readString()
       lastName = parcel.readString()
   }
This is a secondary constructor that is used to create an instance of the Model class from a Parcel. A Parcel is an Android class used for efficient serialization. This constructor reads the values of the properties from the Parcel.
writeToParcel` Function
override fun writeToParcel(parcel: Parcel, flags: Int) {
       parcel.writeString(keyId)
       parcel.writeString(firstName)
       parcel.writeString(lastName)
   }
This function is required when implementing the Parcelable interface. It writes the values of the properties to a Parcel, which is used for serialization.
describeContents` Function
  override fun describeContents(): Int {
       return 0
   }
This function is also required when implementing Parcelable. It describes the type of special objects contained in the Parcelable. In this case, it simply returns 0 because there are no special objects.
CREATOR` Companion Object
companion object CREATOR : Parcelable.Creator<Model> {
       override fun createFromParcel(parcel: Parcel): Model {
           return Model(parcel)
       }

       override fun newArray(size: Int): Array<Model?> {
           return arrayOfNulls(size)
       }
   }
This companion object is used to create instances of Model from a Parcel. It implements two functions required by the Parcelable.Creator interface: createFromParcel and newArray. These functions are used for deserialization.
Step 11: XML Layout File
Design an XML layout file to render individual user data in the ListView.
activity_view_users.xml
<?xml version="1.0" encoding="utf-8"?>
<LinearLayout xmlns:android="http://schemas.android.com/apk/res/android"
    xmlns:app="http://schemas.android.com/apk/res-auto"
    xmlns:tools="http://schemas.android.com/tools"
    android:layout_width="match_parent"
    android:layout_height="match_parent"
    android:orientation="vertical"
    tools:context=".ViewUsers">

    <ListView
        android:id="@+id/lv"
        android:layout_width="match_parent"
        android:layout_height="match_parent" />
</LinearLayout>
Step 12: Create Adapter Class
Develop an adapter class to handle data binding for your ListView.
MyAdapter.kt
class MyAdapter(
    private val adadapterContext:Context,
    private val userlist:MutableList<Model>,
    private val reference: DatabaseReference
):ArrayAdapter<Model>(adadapterContext,R.layout.singledata,userlist) {
    override fun getView(position: Int, convertView: View?, parent: ViewGroup): View {
        //inflate layout for each list item
        val inflate=LayoutInflater.from(adadapterContext)
        val viewItem=inflate.inflate(R.layout.singledata, parent, false)

        //find user id withing inflated layout
        val fnametxt:TextView=viewItem.findViewById(R.id.fnametxt)
        val lnametxt:TextView=viewItem.findViewById(R.id.lnametxt)
        val edituser:Button=viewItem.findViewById(R.id.edituser)
        val deleteuser:Button=viewItem.findViewById(R.id.deleteuser)

        //get the user data for current position
        val userItem:Model=getItem(position)!!

        //now display the user data in the textview
        fnametxt.text=userItem.firstName
        lnametxt.text=userItem.lastName

        //set click listener for edit button
        edituser.setOnClickListener {
            //create an intent and pass the user data
            val intent=Intent(adadapterContext, EditUserData::class.java)
            intent.putExtra("userdata",userItem)
            adadapterContext.startActivity(intent)
        }

        //set click listener for delete button
        deleteuser.setOnClickListener {

            //handle delete button click
            val userkey:String=userItem.keyId!!

            //remove select data from firebase
            reference.child(userkey).removeValue().addOnCompleteListener { task->
                if (task.isSuccessful){
                    // Data deleted successfully, show a toast message
                    Toast.makeText(adadapterContext, "Data deleted successfully", Toast.LENGTH_SHORT).show()

            //remove the item from list and nofity the adapter
            userlist.removeAt(position)
            notifyDataSetChanged()
                }else{
                    // Error occurred while deleting data
                    Toast.makeText(adadapterContext, "Error deleting data", Toast.LENGTH_SHORT).show()
                }
            }
        }
        return viewItem
    }
}
Code Explanation
We created custom adapter class named MyAdapter for populating a ListView with data. This adapter is designed to work with a list of Model objects, where each Model represents some user data. The adapter handles the UI interactions and data binding between the ListView and the data source.
Class Declaration
 class MyAdapter(
       private val adadapterContext: Context,
       private val userlist: MutableList<Model>,
       private val reference: DatabaseReference
   ) : ArrayAdapter<Model>(adadapterContext, R.layout.singledata, userlist) {
This declares the MyAdapter class, which extends ArrayAdapter. It takes three parameters: a Context for the adapter, a list of Model objects (userlist), and a DatabaseReference (reference) for Firebase.
getView` Method
override fun getView(position: Int, convertView: View?, parent: ViewGroup): View {
This is an overridden method from ArrayAdapter. It’s responsible for creating and returning a view for a list item at the specified position.
Inflating the Layout
  val inflate = LayoutInflater.from(adadapterContext)
   val viewItem = inflate.inflate(R.layout.singledata, parent, false)
This code inflates the layout (R.layout.singledata) for each list item, creating a View called viewItem.
Finding UI Elements
val fnametxt: TextView = viewItem.findViewById(R.id.fnametxt)
   val lnametxt: TextView = viewItem.findViewById(R.id.lnametxt)
   val edituser: Button = viewItem.findViewById(R.id.edituser)
   val deleteuser: Button = viewItem.findViewById(R.id.deleteuser)
These lines find the UI elements (e.g., TextView and Button) within the inflated layout (viewItem) by their respective IDs.
Getting User Data
val userItem: Model = getItem(position)!!
This retrieves the Model object (user data) at the current position from the userlist.
Displaying User Data
fnametxt.text = userItem.firstName
   lnametxt.text = userItem.lastName
These lines set the text of the TextView elements (fnametxt and lnametxt) to display the user’s first name and last name.
Edit Button Click Listener
 edituser.setOnClickListener {
       // Create an intent and pass the user data
       val intent = Intent(adadapterContext, EditUserData::class.java)
       intent.putExtra("userdata", userItem)
       adadapterContext.startActivity(intent)
   }
When the “Edit” button is clicked, this code creates an Intent to open the EditUserData activity and passes the user data to it.
Delete Button Click Listener
deleteuser.setOnClickListener {
       // Handle delete button click
       val userkey: String = userItem.keyId!!
       // Remove selected data from Firebase
       reference.child(userkey).removeValue().addOnCompleteListener { task ->
           if (task.isSuccessful) {
               // Data deleted successfully, show a toast message
               Toast.makeText(adadapterContext, "Data deleted successfully", Toast.LENGTH_SHORT).show()

               // Remove the item from the list and notify the adapter
               userlist.removeAt(position)
               notifyDataSetChanged()
           } else {
               // Error occurred while deleting data, show an error toast message
               Toast.makeText(adadapterContext, "Error deleting data", Toast.LENGTH_SHORT).show()
           }
       }
   }
When the “Delete” button is clicked, this code handles the deletion of the user’s data from Firebase. It also displays a toast message indicating whether the operation was successful or not. If successful, it removes the item from the list and notifies the adapter of the data change.
Returning the View
return viewItem
Finally, the getView method returns the populated viewItem as the list item view.
This MyAdapter class is used to manage the interaction between your data (represented by Model objects), the UI elements (e.g., TextView, Button), and the Firebase database for displaying, editing, and deleting user data in a list view. It also provides feedback to the user through toast messages when actions are performed.
Step 13: ViewUsers.kt
Implement the ViewUsers.kt class for viewing data.
ViewUsers.kt
class ViewUsers : AppCompatActivity() {
    private lateinit var listview:ListView
    //list to store user data using the model class
    private val userlist= mutableListOf<Model>()
    //firebase database variable
    private lateinit var databaseReference: DatabaseReference
    private lateinit var firebaseDatabase: FirebaseDatabase
    override fun onCreate(savedInstanceState: Bundle?) {
        super.onCreate(savedInstanceState)
        setContentView(R.layout.activity_view_users)
        //initialize the list view form layout
        listview=findViewById(R.id.lv)
        //get an instent of firebase database
        firebaseDatabase=FirebaseDatabase.getInstance()
        databaseReference=firebaseDatabase.getReference("users")

        //now fetch user data from firebase
        databaseReference.addValueEventListener(object :ValueEventListener{
            override fun onDataChange(snapshot: DataSnapshot) {
                //clear the userlist for avoid dublicate
                userlist.clear()
                //each user data spanshot users node
                for (usnapshot in snapshot.children){
                    val sfname=usnapshot.child("firstName").getValue(String::class.java)
                    val slname=usnapshot.child("lastName").getValue(String::class.java)
                    val keyid=usnapshot.key

                    //create a user model object useing extracted data add it to userlist
                    val model=Model(keyid, sfname, slname)
                    userlist.add(model)
                }
                //we already created adapter, now set it as the adapter for lsitview
                val myAdapter=MyAdapter(this@ViewUsers, userlist,databaseReference)
                listview.adapter=myAdapter
            }

            override fun onCancelled(error: DatabaseError) {
                TODO("Not yet implemented")
            }
        })
    }
}
Code Explanation
This activity is designed to display a list of user data retrieved from a Firebase Realtime Database in a ListView.
Class Declaration
class ViewUsers : AppCompatActivity() {
This declares the ViewUsers class, which extends AppCompatActivity, indicating that it’s an Android activity.
Member Variables
private lateinit var listview: ListView
   private val userlist = mutableListOf<Model>()
   private lateinit var databaseReference: DatabaseReference
   private lateinit var firebaseDatabase: FirebaseDatabase
These member variables are declared to store references to various UI elements and Firebase database components.
onCreate` Method
  override fun onCreate(savedInstanceState: Bundle?) {
       super.onCreate(savedInstanceState)
       setContentView(R.layout.activity_view_users)
The onCreate method is an Android lifecycle method that is called when the activity is created. It sets the content view of the activity to the layout defined in activity_view_users.xml.
Initializing UI Elements
listview = findViewById(R.id.lv)
This line initializes the ListView by finding it in the XML layout using its ID.
Initializing Firebase Database
   firebaseDatabase = FirebaseDatabase.getInstance()
   databaseReference = firebaseDatabase.getReference("users")
These lines initialize Firebase components. It gets an instance of the Firebase database and a reference to the “users” node in the database.
Fetching User Data from Firebase
databaseReference.addValueEventListener(object : ValueEventListener {
       override fun onDataChange(snapshot: DataSnapshot) {
           userlist.clear()
           for (usnapshot in snapshot.children) {
               // Extract first name, last name, and unique key from the snapshot
               val sfname = usnapshot.child("firstName").getValue(String::class.java)
               val slname = usnapshot.child("lastName").getValue(String::class.java)
               val keyid = usnapshot.key

               // Create a user model object using extracted data and add it to userlist
               val model = Model(keyid, sfname, slname)
               userlist.add(model)
           }
           // Create and set the custom adapter for the ListView
           val myAdapter = MyAdapter(this@ViewUsers, userlist, databaseReference)
           listview.adapter = myAdapter
       }

       override fun onCancelled(error: DatabaseError) {
           // Handle database read error (not implemented in this code)
       }
   })
Here, a ValueEventListener is added to the Firebase database reference. This listener listens for changes in the “users” node of the database. When data changes, the onDataChange method is triggered. In this method:
- The userlist is cleared to prevent duplicate data.
- For each user data snapshot (usnapshot) in the “users” node, it extracts the first name, last name, and unique key.
- A Model object is created using the extracted data and added to the userlist.
- A custom adapter (MyAdapter) is created and set as the adapter for the ListView, which populates the list with the user data.
onCancelled` Method (Optional)
 override fun onCancelled(error: DatabaseError) {
       // Handle database read error (not implemented in this code)
   }
This method is part of the ValueEventListener. It is called if there is an error while reading data from the database. However, in this code, the handling of this error is not implemented (TODO comment).
Step 14: Update Data
Create an activity for updating user records.
Step 15: Edit Layout File
Design the layout for editing user data.
activity_edit_user_data.xml
<?xml version="1.0" encoding="utf-8"?>
<LinearLayout xmlns:android="http://schemas.android.com/apk/res/android"
    xmlns:app="http://schemas.android.com/apk/res-auto"
    xmlns:tools="http://schemas.android.com/tools"
    android:layout_width="match_parent"
    android:layout_height="match_parent"
    android:orientation="vertical"
    tools:context=".EditUserData">

    <EditText
        android:id="@+id/editfName"
        android:layout_width="match_parent"
        android:layout_height="wrap_content"
        android:ems="10"
        android:inputType="textPersonName"
        android:text="First Name" />

    <EditText
        android:id="@+id/editlName"
        android:layout_width="match_parent"
        android:layout_height="wrap_content"
        android:ems="10"
        android:inputType="textPersonName"
        android:text="Last Name" />

    <Button
        android:id="@+id/save"
        android:layout_width="match_parent"
        android:layout_height="wrap_content"
        android:text="Save" />
</LinearLayout>
Step 16: Edit Kotlin File
In your Kotlin file for editing user data, add the corresponding logic.
EditUserData.kt
class EditUserData : AppCompatActivity() {
    private lateinit var editfname:EditText
    private lateinit var editlname:EditText
    private lateinit var save:Button
    //firebase database variable
    private lateinit var reference: DatabaseReference
    private lateinit var database: FirebaseDatabase
    override fun onCreate(savedInstanceState: Bundle?) {
        super.onCreate(savedInstanceState)
        setContentView(R.layout.activity_edit_user_data)
        //get reference to the firebase database
        database=FirebaseDatabase.getInstance()
        reference=database.getReference("users")

        //initialize id components
        editfname=findViewById(R.id.editfName)
        editlname=findViewById(R.id.editlName)
        save=findViewById(R.id.save)
        //retrive user data that passed previous activity
        val userData: Model?=intent.getParcelableExtra("userdata")
        if (userData!=null){
            //if user data exists,set user data
            editfname.setText(userData.firstName)
            editlname.setText(userData.lastName)
        }
        //save button click to save udpated data
        save.setOnClickListener {
            //get the updated value
            val newfname:String=editfname.text.toString()
            val newlname:String=editlname.text.toString()
            //perform the udpate on firebase
            if (userData!=null){
                //update the user data with new value
                userData.firstName=newfname
                userData.lastName=newlname

                //use the unique key of the user data to udpate correct entry
                reference.child(userData.keyId!!).child("firstName").setValue(newfname)
                reference.child(userData.keyId!!).child("lastName").setValue(newlname).addOnCompleteListener {task->
                    if (task.isSuccessful){
                        // Data updated successfully, show a success toast message
                        Toast.makeText(this@EditUserData,"Data updated successfully", Toast.LENGTH_SHORT).show()

                //set the resutl calling the activity
                val resutlintent=Intent()
                resutlintent.putExtra("updateuserdata",userData)
                setResult(Activity.RESULT_OK,resutlintent)

                //finish this activity
                finish()
                    }else{
                        // Error occurred while updating data, show an error toast message
                        Toast.makeText(this@EditUserData, "Error updating data", Toast.LENGTH_SHORT).show()
                    }
                }
            }
        }
    }
}
Code Explanation
Android activity class named EditUserData. This activity is designed for editing user data and updating it in a Firebase Realtime Database.
Class Declaration
class EditUserData : AppCompatActivity() {
This declares the EditUserData class, which extends AppCompatActivity, indicating that it’s an Android activity.
Member Variables
private lateinit var editfname: EditText
   private lateinit var editlname: EditText
   private lateinit var save: Button
   private lateinit var reference: DatabaseReference
   private lateinit var database: FirebaseDatabase
These member variables are declared to store references to various UI elements and Firebase database components.
onCreate` Method
 override fun onCreate(savedInstanceState: Bundle?) {
       super.onCreate(savedInstanceState)
       setContentView(R.layout.activity_edit_user_data)
The onCreate method is an Android lifecycle method that is called when the activity is created. It sets the content view of the activity to the layout defined in activity_edit_user_data.xml.
Initializing Firebase Database
  database = FirebaseDatabase.getInstance()
   reference = database.getReference("users")
These lines initialize Firebase components. It gets an instance of the Firebase database and a reference to the “users” node in the database.
Initializing UI Elements
   editfname = findViewById(R.id.editfName)
   editlname = findViewById(R.id.editlName)
   save = findViewById(R.id.save)
These lines initialize various UI elements, including EditText fields and a Button, by finding them in the XML layout using their IDs.
Retrieving User Data
  val userData: Model? = intent.getParcelableExtra("userdata")
   if (userData != null) {
       editfname.setText(userData.firstName)
       editlname.setText(userData.lastName)
   }
This code retrieves user data that was passed from the previous activity using an Intent. If the user data exists, it sets the EditText fields with the user’s first name and last name.
Handling Save Button Click
save.setOnClickListener {
       val newfname: String = editfname.text.toString()
       val newlname: String = editlname.text.toString()
       if (userData != null) {
           userData.firstName = newfname
           userData.lastName = newlname
           reference.child(userData.keyId!!).child("firstName").setValue(newfname)
           reference.child(userData.keyId!!).child("lastName").setValue(newlname)
               .addOnCompleteListener { task ->
                   if (task.isSuccessful) {
                       // Data updated successfully, show a success toast message
                       Toast.makeText(
                           this@EditUserData,
                           "Data updated successfully",
                           Toast.LENGTH_SHORT
                       ).show()

                       // Set the result for the calling activity
                       val resultIntent = Intent()
                       resultIntent.putExtra("updateuserdata", userData)
                       setResult(Activity.RESULT_OK, resultIntent)

                       // Finish this activity
                       finish()
                   } else {
                       // Error occurred while updating data, show an error toast message
                       Toast.makeText(
                           this@EditUserData,
                           "Error updating data",
                           Toast.LENGTH_SHORT
                       ).show()
                   }
               }
       }
   }
- This code handles the click event of the “Save” button. When the button is clicked:
- It retrieves the updated values from the EditText fields.
- It updates the user data in Firebase by setting the new first name and last name using the unique key of the user data.
- It adds an OnCompleteListener to handle the result of the database update operation. If the update is successful, it shows a success toast message, sets the result for the calling activity, and finishes the current activity. If there’s an error, it shows an error toast message.
Congratulations! Your Android CRUD application is now ready. Test it on your device or emulator to ensure it works seamlessly and check the database for verification.
