RadioButtons save the value in the SQLite database and will display the value in ListView in Android.
In this tutorial, we will create a simple radio button in the SQLite database.
The Radiobuttons value is inserted into the database and displayed in the ListView.
But a question would arise in one’s mind that what is the use of this radio button but you can use to select an option on a list of a set or both. We use radio buttons for gender, question, etc.
Simply, we used the RadioGroup widget in the XML resource file. You have to group them inside a radio group.
When using any of the radio buttons in the RadioGroup at once, the RadioButton receives an on-click event.
What a new In this app?
Every tutorial first we know what’s new in-app. So first in this tutorial, we know what’s new in this tutorial app.
We will use RadioButton inside RadioGroup and display each Radiobutton value in ListView.
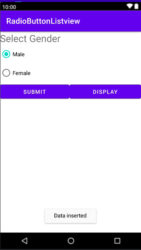
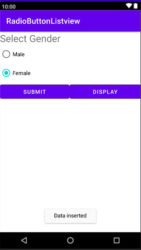
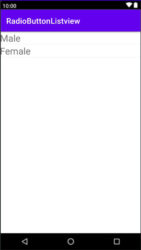
There are two buttons, one is the submit button and the other is the display button. Will create a new activity to show the data in ListView while clicking on display button. First, we select a radio button and on clicking the submit button, the radiobutton value is inserted into the database. When clicking display button, get radio button value in ListView using ListView and Adapter.
Let us understand with step by step example.
Step 1:
Create a new project in android studio.
Step 2:
Fill out the required field.
Step 3:
Go to activity_main.xml.
App -> res -> layout -> activity_main.xml
We will add RadioGroup inside LinearLayout. Inside radiogroup we will use text view and recommended two radio buttons and submit and display button to display data in other activities. Below, is a full example of activity_main.xml.
activity_main.xml
<?xml version="1.0" encoding="utf-8"?>
<LinearLayout xmlns:android="http://schemas.android.com/apk/res/android"
    xmlns:app="http://schemas.android.com/apk/res-auto"
    xmlns:tools="http://schemas.android.com/tools"
    android:layout_width="match_parent"
    android:layout_height="match_parent"
    android:orientation="vertical"
    tools:context=".MainActivity" >

    <RadioGroup
        android:layout_width="match_parent"
        android:layout_height="match_parent" >

        <TextView
            android:id="@+id/textView"
            android:layout_width="match_parent"
            android:layout_height="wrap_content"
            android:text="Select Gender"
            android:textSize="25dp" />

        <RadioButton
            android:id="@+id/radioButton"
            android:layout_width="match_parent"
            android:layout_height="wrap_content"
            android:text="Male" />

        <RadioButton
            android:id="@+id/radioButton2"
            android:layout_width="match_parent"
            android:layout_height="wrap_content"
            android:text="Female" />

        <LinearLayout
            android:layout_width="match_parent"
            android:layout_height="match_parent"
            android:orientation="horizontal">

            <Button
                android:id="@+id/button"
                android:layout_width="wrap_content"
                android:layout_height="wrap_content"
                android:layout_weight="1"
                android:text="Submit" />

            <Button
                android:id="@+id/button2"
                android:layout_width="wrap_content"
                android:layout_height="wrap_content"
                android:layout_weight="1"
                android:text="display" />
        </LinearLayout>
    </RadioGroup>
</LinearLayout>
Step 4:
Now, create a new activity for displaying data.
Right-click on package name ⇾New ⇾ Activity ⇾ Empty Activity named DisplayData.
In the Activity_display_data.xml file, we use ListView to display data.
The code of activity_display_data.xml is given below.
activity_display_data.xml
<?xml version="1.0" encoding="utf-8"?>
<LinearLayout xmlns:android="http://schemas.android.com/apk/res/android"
    xmlns:app="http://schemas.android.com/apk/res-auto"
    xmlns:tools="http://schemas.android.com/tools"
    android:layout_width="match_parent"
    android:layout_height="match_parent"
    android:orientation="vertical"
    tools:context=".DisplayData">

    <ListView
        android:id="@+id/lv"
        android:layout_width="match_parent"
        android:layout_height="match_parent" />
</LinearLayout>
Step 5:
Now, create a new resource file in the Layout file.
In the new layout resource file, we’ll create a TextView to display the radio button value in TextView.
Right-click Layout ⇾ New ⇾ Layout Resource file.
singledata.xml
<?xml version="1.0" encoding="utf-8"?>
<LinearLayout xmlns:android="http://schemas.android.com/apk/res/android"
    android:layout_width="match_parent"
    android:layout_height="match_parent"
    android:orientation="vertical">

    <TextView
        android:id="@+id/displayname"
        android:layout_width="match_parent"
        android:layout_height="wrap_content"
        android:text="TextView"
        android:textSize="24dp" />
</LinearLayout>
Step 6:
In this step, we’ll create a new java class for a database.
Now, starting a java class file and extends SQLiteOpenHelper for detail Read.
App ⇾ java ⇾ right-clicks on the package name and create a New java class named DBmain.
We’ll implement the abstract method onCreate and onUpgrade.
Below is the complete code for database and table in DBmain.java class.
DBmain.java
package com.pd.radiobuttonlistview;

import android.content.Context;
import android.database.sqlite.SQLiteDatabase;
import android.database.sqlite.SQLiteOpenHelper;

import androidx.annotation.Nullable;

public class DBmain extends SQLiteOpenHelper {
    public static final String DB="student.db";
    public static final int VER=1;
    public DBmain(@Nullable Context context) {
        super(context, DB, null, VER);
    }

    @Override
    public void onCreate(SQLiteDatabase db) {
        String qauery="create table studenttable(id integer primary key,gender text)";
        db.execSQL(qauery);
    }

    @Override
    public void onUpgrade(SQLiteDatabase db, int oldVersion, int newVersion) {
String qauery="drop table if exists studenttable";
db.execSQL(qauery);
onCreate(db);
    }
}
Step 7:
Now, go to MainActivity.java.
App ⇾ java ⇾ package name ⇾ MainActivity.java.
In MainActivity.java we’ll create a DBmain, SQLiteDatabase and RadioButton and button object.
Then create a findid() and insertData method.
We’ll use onclick listener for inserting data and displaying.
We already understand this method in previous chapter.
See the below full example for detail.
MainActivity.java
package com.pd.radiobuttonlistview;

import androidx.appcompat.app.AlertDialog;
import androidx.appcompat.app.AppCompatActivity;

import android.content.ContentValues;
import android.content.Intent;
import android.database.sqlite.SQLiteDatabase;
import android.os.Bundle;
import android.view.View;
import android.widget.Button;
import android.widget.RadioButton;
import android.widget.Toast;

public class MainActivity extends AppCompatActivity {
DBmain dBmain;
SQLiteDatabase sqLiteDatabase;
RadioButton radioButton,radioButton2;
Button button,button2;
    @Override
    protected void onCreate(Bundle savedInstanceState) {
        super.onCreate(savedInstanceState);
        setContentView(R.layout.activity_main);
        dBmain=new DBmain(MainActivity.this);
        findid();
        insertData();
    }

    private void insertData() {
        button.setOnClickListener(new View.OnClickListener() {
            @Override
            public void onClick(View v) {
                ContentValues contentValues=new ContentValues();
                if (radioButton.isChecked()){
                    Toast.makeText(MainActivity.this, "check", Toast.LENGTH_SHORT).show();
                    contentValues.put("gender",radioButton.getText().toString());

                }else {
                    contentValues.put("gender",radioButton2.getText().toString());
                }
                sqLiteDatabase=dBmain.getWritableDatabase();
                Long rec=sqLiteDatabase.insert("studenttable",null,contentValues);
                if (rec!=null){
                    Toast.makeText(MainActivity.this, "Data inserted", Toast.LENGTH_SHORT).show();

                }else {
                    AlertDialog.Builder builder=new AlertDialog.Builder(MainActivity.this);
                    builder.setTitle("Error");
                    builder.setMessage("Data not Inserted");
                    builder.setPositiveButton("OK",null);
                    builder.setCancelable(true);
                    builder.show();
                }
            }
        });
        //display dta when click display button
        button2.setOnClickListener(new View.OnClickListener() {
            @Override
            public void onClick(View v) {
                Intent intent=new Intent(MainActivity.this,DisplayData.class);
                startActivity(intent);
            }
        });
    }

    private void findid() {
        radioButton=(RadioButton)findViewById(R.id.radioButton);
        radioButton2=(RadioButton)findViewById(R.id.radioButton2);
        button=(Button)findViewById(R.id.button);
        button2=(Button)findViewById(R.id.button2);
    }
}
Step 8:
Go to the DisplayData.java Activity.
App ⇾ Java Package name ⇾ DisplayData.java, which we created earlier.
In DisplayData.java, we’ll extend BaseAdapter and use the CustomAdapter method.
Let us understand with an example.
DisplalyData.java
package com.pd.radiobuttonlistview;

import androidx.appcompat.app.AppCompatActivity;

import android.database.Cursor;
import android.database.sqlite.SQLiteDatabase;
import android.os.Bundle;
import android.view.LayoutInflater;
import android.view.View;
import android.view.ViewGroup;
import android.widget.BaseAdapter;
import android.widget.ListView;
import android.widget.TextView;

public class DisplayData extends AppCompatActivity {
DBmain dBmain;
SQLiteDatabase sqLiteDatabase;
ListView listView;
String[]name;
int[]id;
    @Override
    protected void onCreate(Bundle savedInstanceState) {
        super.onCreate(savedInstanceState);
        setContentView(R.layout.activity_display_data);
        dBmain=new DBmain(DisplayData.this);
        findid();
        displayData();
    }

    private void displayData() {
        sqLiteDatabase=dBmain.getReadableDatabase();
        Cursor cursor=sqLiteDatabase.rawQuery("select *from studenttable",null);
        if (cursor.getCount()>0){
            id=new int[cursor.getCount()];
            name=new String[cursor.getCount()];
            int i=0;
            while (cursor.moveToNext()){
                id[i]=cursor.getInt(0);
                name[i]=cursor.getString(1);
                i++;
            }

            Custom custom=new Custom();
            listView.setAdapter(custom);
        }
    }

    private void findid() {
        listView=(ListView)findViewById(R.id.lv);
    }

    private class Custom extends BaseAdapter {
        @Override
        public int getCount() {
            return name.length;
        }

        @Override
        public Object getItem(int position) {
            return null;
        }

        @Override
        public long getItemId(int position) {
            return 0;
        }

        @Override
        public View getView(int position, View convertView, ViewGroup parent) {
            TextView textView;
          convertView= LayoutInflater.from(DisplayData.this).inflate(R.layout.singledata,parent,false);
           textView=convertView.findViewById(R.id.displayname);
           textView.setText(name[position]);
            return convertView;
        }
    }
}
Finally, the radio button App Ready. Now, run your app and see the output.
The output will be like the image given below.
Watch On YouTube
