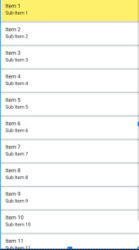
ListView displays an item scrollable list using the adapter.
Listview is XML widget.
ListView and Gridview are both subclasses of adapteiview.
Also Read: GridView in android example
In this tutorial, we’ll discuss ListView in android.
How does ListView work in android?
We will use an adapter and a single view to display a list of items in a list.
In short, using ListView displays items vertically scrollable so no need to add a scroll view.
we’ll use setOnItemClickListener in the java file so when clicking on each item handle on click events.
What is covered in this tutorial?
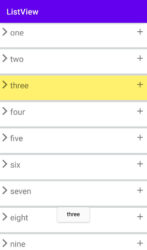
The TextView items will display in the ListView.
Tab on selected item change background color.
When pressing each item a toast message is displayed.
Use icon a makes beautiful ListView UI.
Let us know more about with an example
Step 1:
Create a new project in Android Studio.
Step 2:
Fill out all required fields.
Step 3:
Now, let’s start creating UI design so that we can easily pass attribute to Java class.
Go to a default activity activity_main.xml.
res -> layout -> activity_main.xml
Add ListView widget.
For example
<ListView
        android:choiceMode="singleChoice"
        android:listSelector="#BFFFEB3B"
        android:id="@+id/listview"
        android:layout_width="match_parent"
        android:layout_height="match_parent"
        android:divider="#D2D6D6"
        android:dividerHeight="5dp" />
android:choiceMode="singleChoice"
This attribute use to selection single item in ListView.
android:listSelector="#BFFFEB3B"
Selected item background color.
android:divider="#D2D6D6"
divider color.
android:dividerHeight="5dp"
divider height.
Full example of activity_main.xml
Activity_main.xml
<?xml version="1.0" encoding="utf-8"?>
<LinearLayout xmlns:android="http://schemas.android.com/apk/res/android"
    xmlns:app="http://schemas.android.com/apk/res-auto"
    xmlns:tools="http://schemas.android.com/tools"
    android:layout_width="match_parent"
    android:layout_height="match_parent"
    tools:context=".MainActivity">

    <ListView
        android:choiceMode="singleChoice"
        android:listSelector="#BFFFEB3B"
        android:id="@+id/listview"
        android:layout_width="match_parent"
        android:layout_height="match_parent"
        android:divider="#D2D6D6"
        android:dividerHeight="5dp" />
</LinearLayout>
UI design

Step 4:
Now, let’s create a single XML file so that the item can be displayed listview using the array adapter.
Also Read: CardView in android with example
In a single XML file, we’ll use two image views and TextView. In ImageView we’ll use the icon and textView display arrayData that will use in the java class.
Single XML file code is given below.
Singledata.xml
<?xml version="1.0" encoding="utf-8"?>
<RelativeLayout xmlns:android="http://schemas.android.com/apk/res/android"
    android:layout_width="match_parent"
    android:layout_height="match_parent"
    android:orientation="vertical">

    <ImageView
        android:layout_width="wrap_content"
        android:layout_height="wrap_content"
        android:layout_marginTop="@dimen/mt"
        android:src="@drawable/ic_baseline_arrow_forward_ios_24" />

    <TextView
        android:id="@+id/textview"
        android:layout_width="wrap_content"
        android:layout_height="50dp"
        android:layout_marginLeft="@dimen/ml"
        android:layout_marginTop="@dimen/mt"
        android:text="@string/app_name"
        android:textSize="@dimen/ts" />

    <ImageView
        android:layout_width="wrap_content"
        android:layout_height="wrap_content"
        android:layout_alignEnd="@+id/textview"
        android:layout_alignParentEnd="true"
        android:layout_marginTop="@dimen/mt"
        android:layout_marginRight="@dimen/mr"
        android:src="@drawable/ic_baseline_add_24" />

</RelativeLayout>
The view is ready now starting java code.
Step 5:
Go to Mainactivity.
app -> java -> packagename -> MainActivity.java
In the main activity, we’ll be creating some string arrays to displaying data in list view.
String[]list={"one","two","three","four","five","six","seven", "eight","nine","ten"};
Also, we’ll be creating ListView and TextView objects. Afterward, find id.
Finally, we’ll create an array adapter.
 final ArrayAdapter<String>adapter=new ArrayAdapter<String>(this,R.layout.singledata,R.id.textview,list);
        listView.setAdapter(adapter);
Now, we want to show the Toast message when clicking on the ListView item.
We’ll use setOnItemClickListener and set Toast message.
listView.setOnItemClickListener(new AdapterView.OnItemClickListener() {
            @Override
            public void onItemClick(AdapterView<?> parent, View view, int position, long id) {
            String value=adapter.getItem(position);
                Toast.makeText(MainActivity.this,value, Toast.LENGTH_SHORT).show();
            }
        });
Above all java part mixing, let us see full-example
MainActivity.java
package com.pd.listview;

import androidx.appcompat.app.AppCompatActivity;

import android.graphics.Color;
import android.os.Bundle;
import android.view.View;
import android.widget.AdapterView;
import android.widget.ArrayAdapter;
import android.widget.ImageView;
import android.widget.ListView;
import android.widget.TextView;
import android.widget.Toast;

public class MainActivity extends AppCompatActivity {
ListView listView;
TextView textView;
int sele;
String[]list={"one","two","three","four","five","six","seven", "eight","nine","ten"};
    @Override
    protected void onCreate(Bundle savedInstanceState) {
        super.onCreate(savedInstanceState);
        setContentView(R.layout.activity_main);

        listView=(ListView)findViewById(R.id.listview);
        textView=(TextView)findViewById(R.id.textview);
        final ArrayAdapter<String>adapter=new ArrayAdapter<String>(this,R.layout.singledata,R.id.textview,list);
        listView.setAdapter(adapter);

        listView.setOnItemClickListener(new AdapterView.OnItemClickListener() {
            @Override
            public void onItemClick(AdapterView<?> parent, View view, int position, long id) {
            String value=adapter.getItem(position);
                Toast.makeText(MainActivity.this,value, Toast.LENGTH_SHORT).show();
            }
        });
    }
}
Lastly, Run your apps.
See the below image.

Watch on YouTube


