JSON data receive and display in ListView
We already know about “Display data in ListView using SQLite database“. If you want to get data from API then API needs JSON format.
JSON is the short form of JavaScript Object Notation.
Why use JSON?
JSON is like an XML that you can use and manipulate easily. You can easily get data from the server via HTTP POST and GET method. We can easily parse JSON format data in Android.
Now we come to the point, we were talking about JSON data display in ListView in android.
Why use Retrofit?
In these tutorials, we used the Retrofit library for HTTP client requests. Using Retrofit, we can easily parse API response and show them in-app.
Why used the Gson converter in android?
We get data JSON data in the server, so we need to it convert java objects. So we need to Gson converter library that simple Gson data convert and also convert java objects into their JSON representation.
What topics will be covered in these tutorials?
- JSON “placeholder” Rest API for testing purposes.
- Retrofit library for HTTP requests.
- Displaying data in ListView in Android.
Now let us see an example step by step so that we can understand it easily.
How to display JSON array data in ListView in Android App?
Step: 1
Create a new Android project.
Step: 2
First, we create a UI design, so go to activity_main.xml and add the ListView widget to display the data in the ListView.
Res⇾layout⇾activity_main.xml
The following code of activity_main.xml
activity_main.xml
<?xml version="1.0" encoding="utf-8"?>
<LinearLayout xmlns:android="http://schemas.android.com/apk/res/android"
    xmlns:app="http://schemas.android.com/apk/res-auto"
    xmlns:tools="http://schemas.android.com/tools"
    android:layout_width="match_parent"
    android:layout_height="match_parent"
    tools:context=".MainActivity">

    <ListView
        android:layout_width="match_parent"
        android:layout_height="wrap_content"
        android:id="@+id/lv"/>
</LinearLayout>
Step: 3
Now we need to single view XML file for creating singleview which we already discussed in previous tutorials.
Create a new single view XML layout resource file.
Res⇾Right-click on Layout ⇾ new ⇾layout resource file
The following code of singleview.xml resource file.
Singleview.xml
<?xml version="1.0" encoding="utf-8"?>
<LinearLayout
    xmlns:android="http://schemas.android.com/apk/res/android" android:layout_width="match_parent"
    android:layout_height="match_parent"
    android:orientation="vertical"
    android:padding="12dp">
    <TextView
        android:textSize="20dp"
        android:layout_width="match_parent"
        android:layout_height="wrap_content"
        android:id="@+id/idtxt"/>
    <TextView
        android:textSize="20dp"
        android:layout_width="match_parent"
        android:layout_height="wrap_content"
        android:id="@+id/titletxt"/>
    <TextView
        android:textSize="20dp"
        android:layout_width="match_parent"
        android:layout_height="wrap_content"
        android:id="@+id/bodytxt"/>

</LinearLayout>
Permission
Step: 4
We parse HTTP requests on server side, so we have to give internet permission in android manifest file.
Go to Manifest⇾AndoridManifest.xml and add the following permission.
<uses-permission android:name="android.permission.INTERNET"/>
Dependencies
Step: 5
We’re parsing server-side res API JSON data and we want to show JSON data in android ListView. This work is done using a third-party library. Using this, we easily client-side requests and convert JSON to java objects.
In this tutorial, we used the following two dependencies
Gradle Scripts⇾build.gradle(module:app)
Add following dependencies.
    implementation 'com.squareup.retrofit2:retrofit:2.9.0'
    implementation 'com.squareup.retrofit2:converter-gson:2.9.0'
Step: 6
Create a model class for storing JSON data.
Java ⇾ right-clicks on the package name⇾new ⇾ java class.
The following code of the Model class
Model.java
package com.example.retrofitandroid;

class Model {
    private String id,title,body;

    public Model(String id, String title, String body) {
        this.id = id;
        this.title = title;
        this.body = body;
    }

    public String getId() {
        return id;
    }

    public void setId(String id) {
        this.id = id;
    }

    public String getTitle() {
        return title;
    }

    public void setTitle(String title) {
        this.title = title;
    }

    public String getBody() {
        return body;
    }

    public void setBody(String body) {
        this.body = body;
    }
}
Step: 7
We need a Java interface class for API calls.
Here, we use HTTP GET requests to show JSON data in ListView.
We used a simple test rest API from https://jsonplaceholder.typicode.com/posts and displayed its data in a ListView.
Create an interface class
Java ⇾Right-click on package⇾new ⇾java Class, and select Interface.
The following code for the Java Interface API calls class.
package com.example.retrofitandroid;

import java.util.ArrayList;

import retrofit2.Call;
import retrofit2.http.GET;

interface MyApi {
    @GET("posts")
    Call<ArrayList<Model>>callModel();
}
Step: 8
Now go to MainActivity.java class.
Java ⇾package name⇾MainActivity.java.
Create variables and initialize.
Create a new method inside the class named displayJsonData();, and call it.
Then add retrofit inside the method displayJsonData();, and parsing base URL then after adding Gson covert factory.
We implementation the API class and manipulate the size of the array to store the list.
We request API to send requests and callback responses.
See the following code of retrofit
private void displayRetrofitData() {
        Retrofit retrofit=new Retrofit.Builder ()
                .baseUrl ( BaseUrl )
                .addConverterFactory ( GsonConverterFactory.create () )
                .build ();
        myApi=retrofit.create ( MyApi.class );
        Call<ArrayList<Model>>arrayListCall=myApi.callModel ();
        arrayListCall.enqueue ( new Callback<ArrayList<Model>> () {
            @Override
            public void onResponse(Call<ArrayList<Model>> call, Response<ArrayList<Model>> response) {
                modelArrayList=response.body ();
                for (int i=0;i<modelArrayList.size ();i++);
                //create adapter
                Custom custom=new Custom(modelArrayList,MainActivity.this,R.layout.singleview);
                lv.setAdapter ( custom );
            }

            @Override
            public void onFailure(Call<ArrayList<Model>> call, Throwable t) {
                Toast.makeText ( MainActivity.this, "Failed to load data", Toast.LENGTH_SHORT ).show ();
            }
        } );
    }
You notice that the custom-named adapter is called here.
and last failure callback method we used toast message, if data is not loaded then toast message will show.
The following code is MainActivity.java.
MainActivity.java
package com.example.retrofitandroid;

import androidx.appcompat.app.AppCompatActivity;

import android.os.Bundle;
import android.view.Display;
import android.widget.ListView;
import android.widget.Toast;

import java.util.ArrayList;

import retrofit2.Call;
import retrofit2.Callback;
import retrofit2.Response;
import retrofit2.Retrofit;
import retrofit2.converter.gson.GsonConverterFactory;

public class MainActivity extends AppCompatActivity {
private ArrayList<Model>modelArrayList;
private MyApi myApi;
private ListView lv;
private String BaseUrl="https://jsonplaceholder.typicode.com/";
    @Override
    protected void onCreate(Bundle savedInstanceState) {
        super.onCreate ( savedInstanceState );
        setContentView ( R.layout.activity_main );
        lv=findViewById ( R.id.lv );
        modelArrayList=new ArrayList<> ();
        //create a method
        displayRetrofitData();
    }

    private void displayRetrofitData() {
        Retrofit retrofit=new Retrofit.Builder ()
                .baseUrl ( BaseUrl )
                .addConverterFactory ( GsonConverterFactory.create () )
                .build ();
        myApi=retrofit.create ( MyApi.class );
        Call<ArrayList<Model>>arrayListCall=myApi.callModel ();
        arrayListCall.enqueue ( new Callback<ArrayList<Model>> () {
            @Override
            public void onResponse(Call<ArrayList<Model>> call, Response<ArrayList<Model>> response) {
                modelArrayList=response.body ();
                for (int i=0;i<modelArrayList.size ();i++);
                //create adapter
                Custom custom=new Custom(modelArrayList,MainActivity.this,R.layout.singleview);
                lv.setAdapter ( custom );
            }

            @Override
            public void onFailure(Call<ArrayList<Model>> call, Throwable t) {
                Toast.makeText ( MainActivity.this, "Failed to load data", Toast.LENGTH_SHORT ).show ();
            }
        } );
    }
}
Step: 8
Now, create a new class named Custom.
Java ⇾right click on the package name⇾new ⇾java class.
Extends BaseAdapter and generates constructor and implements the method.
At last, we get the position of TextView and set the position.
The following code is Custom.java class.
Custom.java
package com.example.retrofitandroid;

import android.content.Context;
import android.view.LayoutInflater;
import android.view.View;
import android.view.ViewGroup;
import android.widget.BaseAdapter;
import android.widget.TextView;

import java.util.ArrayList;

class Custom extends BaseAdapter {
private ArrayList<Model>modelArrayList;
private Context context;
private int layout;
//generqate constructor

    public Custom(ArrayList<Model> modelArrayList, Context context, int layout) {
        this.modelArrayList = modelArrayList;
        this.context = context;
        this.layout = layout;
    }

    @Override
    public int getCount() {
        return modelArrayList.size ();
    }

    @Override
    public Object getItem(int position) {
        return modelArrayList.get ( position );
    }

    @Override
    public long getItemId(int position) {
        return position;
    }
//create view holder innter class
    private class ViewHolder{
        TextView idtxt,titletxt,bodytxt;
}
    @Override
    public View getView(int position, View convertView, ViewGroup parent) {
        ViewHolder viewHolder=new ViewHolder ();
        LayoutInflater layoutInflater=(LayoutInflater)context.getSystemService ( Context.LAYOUT_INFLATER_SERVICE );
        convertView=layoutInflater.inflate ( layout,null );
        //id type casting
        viewHolder.idtxt=convertView.findViewById ( R.id.idtxt );
        viewHolder.titletxt=convertView.findViewById ( R.id.titletxt );
        viewHolder.bodytxt=convertView.findViewById ( R.id.bodytxt );

        //set position
        Model model=modelArrayList.get ( position );
        viewHolder.idtxt.setText ("Id:-"+ model.getId ()+ "\n");
        viewHolder.titletxt.setText ("Title:-"+ model.getTitle ()+"\n" );
        viewHolder.bodytxt.setText ( "Body:-"+model.getBody () );
        return convertView;
    }
}
Now your app is ready.
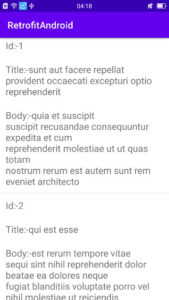
Run your app and see the output.
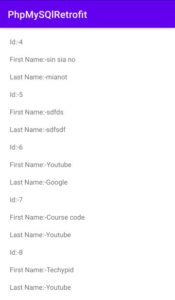
The output looks like the below snapshot.

Note: In this post, if you find any mistakes or bugs and errors, feel free to contact or give feedback to improve the quality. Great if you give your feedback about this tutorial and other tutorials.


