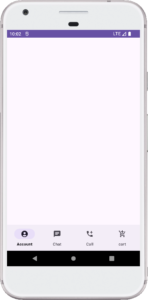
Hello, In this tutorial, we’re going to create a bottom navigation bar in Android Studio.
If you’re a beginner, this tutorial will guide you through the process step by step. So, let’s get started!
How to Create a Bottom Navigation Menu in Android Studio
Step 1: Open Android Studio and Create a New Project
Start Android Studio and create a new project. Choose an appropriate project template and set up your project settings.
Step 2: Add a BottomAppBar
Open the XML layout file (activity_main.xml or similar) and add a BottomAppBar to your CoordinatorLayout. This component provides a space for navigation items at the bottom of the screen.
<com.google.android.material.bottomappbar.BottomAppBar
        android:layout_width="match_parent"
        android:layout_height="wrap_content"
        android:layout_gravity="bottom"
        app:fabCradleMargin="10dp"
        app:fabCradleRoundedCornerRadius="50dp"
        app:contentInsetEnd="0dp"
        app:contentInsetStart="0dp"
        android:id="@+id/bottomappbar">
Step 3: Add a BottomNavigationView
Inside the BottomAppBar, include a BottomNavigationView with the ID bottomnavigation.
This view will hold your navigation items and allow users to navigate between different sections of your app.
<com.google.android.material.bottomnavigation.BottomNavigationView
    android:layout_width="match_parent"
    android:layout_height="wrap_content"
    android:id="@+id/bottomnavigation"
    app:labelVisibilityMode="labeled"
    app:menu="@menu/bottom_nav_menu"/>
Here is the complete code of the bottom navigation XML file.
<?xml version="1.0" encoding="utf-8"?>
<androidx.coordinatorlayout.widget.CoordinatorLayout xmlns:android="http://schemas.android.com/apk/res/android"
    xmlns:app="http://schemas.android.com/apk/res-auto"
    xmlns:tools="http://schemas.android.com/tools"
    android:layout_width="match_parent"
    android:layout_height="match_parent"
    tools:context=".MainActivity">

    <com.google.android.material.bottomappbar.BottomAppBar
        android:layout_width="match_parent"
        android:layout_height="wrap_content"
        android:layout_gravity="bottom"
        app:fabCradleMargin="10dp"
        app:fabCradleRoundedCornerRadius="50dp"
        app:contentInsetEnd="0dp"
        app:contentInsetStart="0dp"
        android:id="@+id/bottomappbar">

        <com.google.android.material.bottomnavigation.BottomNavigationView
            android:layout_width="match_parent"
            android:layout_height="wrap_content"
            android:id="@+id/bottomnavigation"
            app:labelVisibilityMode="labeled"
             app:menu="@menu/bottom_nav_menu"/>
    </com.google.android.material.bottomappbar.BottomAppBar>


</androidx.coordinatorlayout.widget.CoordinatorLayout>
Step 4: Create a Menu in the “res” Directory
In Android Studio, navigate to the res directory in your project.
Right-click on the res directory, choose New, then select Android Resource Directory.
Step 5: Configure the New Resource Directory
Set the Resource type to menu. Click on the OK button to create the new menu directory.
Now, you have a dedicated directory for storing your menu resources.
Step 6: Create a Menu Resource File
Inside the newly created menu directory, right-click and choose New -> Menu resource file. Give your menu a name, for example, bottom_nav_menu.
Step 7: Design Your Bottom Navigation Menu
Open the bottom_nav_menu.xml file you just created.
Define your menu items. For example, you can have items for different sections of your app, each represented by an icon and a label.
Here’s a simple example
<?xml version="1.0" encoding="utf-8"?>
<menu xmlns:android="http://schemas.android.com/apk/res/android">
<item
    android:id="@+id/nav_account"
    android:icon="@drawable/baseline_account_circle_24"
    android:title="Account"/>
    <item
        android:id="@+id/nav_chat"
        android:icon="@drawable/baseline_chat_24"
        android:title="Chat"/>

    <item
        android:id="@+id/nav_call"
        android:icon="@drawable/baseline_add_ic_call_24"
        android:title="Call"/>
    <item
        android:id="@+id/nav_cart"
        android:icon="@drawable/baseline_add_shopping_cart_24"
        android:title="cart"/>
</menu>
Customize the id, title, and icon attributes based on your app’s needs.
Now, run your app and check the expected result.


