In this tutorial, we’ll create a custom navigation drawer in android studio.
Most applications have a navigation drawer.
We put the menu and other components in the navigation drawer.
In most apps navigation drawer have an image, header text and other setting components like setting, account, menu, sharing option or more option are in navigation drawer.
Also Read: share app link in android
In short navigation, a drawer is one type of android UI design that using we can include different components in it.
How work the navigation drawer?
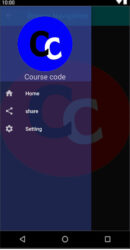
When clicking on the hamburger menu or swipe screen as have drawer then navigation drawer navigation drawer appears.
Let’s start implement navigation step by step in android
Step 1:
Create an android studio new project.
Step 2:
Select the empty activity and enter the required field.
Step 3:
Now, you are ready to create drawer navigation in android.
Step 4:
First of all adding dependency in “build.gradle”
implementation 'com.google.android.material:material:1.3.0'
The new android studio already has an added “dependency” so no deeded added dependency.
After adding a new dependency. Click on the “Sync Now” link.
Step:5
In this step, we’ll create a menu folder under the res folder.
After creating the menu folder, add the menu resource file.
Right-click on the menu folder ->new ->menu resource file.
We’ll need some menus with icons in a menu resource file.
Also Read: splash screen in android studio
We need some icons to import icons.
Drawable ->new -> vector asset
Given the following code of the menu resource file.
Menu.xml
<?xml version="1.0" encoding="utf-8"?>
<menu xmlns:android="http://schemas.android.com/apk/res/android">
    <item
        android:id="@+id/menu_home"
        android:icon="@drawable/ic_baseline_home_24"
        android:title="Home" />

    <item
        android:id="@+id/menu_share"
        android:icon="@drawable/ic_baseline_share_24"
        android:title="share" />

    <item
        android:id="@+id/menu_setting"
        android:icon="@drawable/ic_baseline_settings_24"
        android:title="Setting" />

</menu>
Step 6:
Open activity_main.xml file.
App ->res->layout->activity_main.xml
For example, we used drawerLayout, ImageView, RelativeLayout, toolbar and NavigationView.
Add following code in activity_main.xml
Activity_main.xml
<?xml version="1.0" encoding="utf-8"?>
<androidx.drawerlayout.widget.DrawerLayout xmlns:android="http://schemas.android.com/apk/res/android"
    xmlns:app="http://schemas.android.com/apk/res-auto"
    xmlns:tools="http://schemas.android.com/tools"
    android:id="@+id/drawer"
    android:layout_width="match_parent"
    android:layout_height="match_parent"
    tools:context=".MainActivity"
    tools:openDrawer="start">

    <ImageView
        android:layout_width="100dp"
        android:layout_height="100dp"
        android:src="@drawable/courcecode1" />

    <RelativeLayout
        android:layout_width="wrap_content"
        android:layout_height="wrap_content">

        <androidx.appcompat.widget.Toolbar
            android:id="@+id/toolbar"
            android:layout_width="match_parent"
            android:layout_height="wrap_content"
            android:background="@color/teal_700"
            app:title=" Drawer Navigation "
            app:titleTextColor="#0ff" />
    </RelativeLayout>

    <com.google.android.material.navigation.NavigationView
        android:id="@+id/navmenu"
        android:layout_width="250sp"
        android:layout_height="match_parent"
        android:layout_gravity="start"
        android:background="@color/trans"
        app:headerLayout="@layout/navheader"
        app:menu="@menu/menu" />

</androidx.drawerlayout.widget.DrawerLayout>
Step 7:
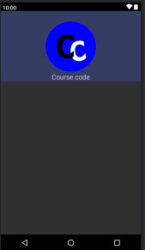
Now, let’s create a navigation header.
Create a new layout file in the layout folder.
Right-click on layout and create a new resource file.
App -> res -> layout -> navheader.xml
Navheader.xml
<?xml version="1.0" encoding="utf-8"?>
<androidx.appcompat.widget.LinearLayoutCompat xmlns:android="http://schemas.android.com/apk/res/android"
    android:layout_width="match_parent"
    android:layout_height="wrap_content"
    android:background="@color/trans"
    android:orientation="vertical">

    <ImageView
        android:layout_width="150dp"
        android:layout_height="150dp"
        android:layout_gravity="center"
        android:layout_marginTop="30dp"
        android:scaleType="fitXY"
        android:src="@drawable/courcecode" />

    <TextView
        android:layout_width="wrap_content"
        android:layout_height="wrap_content"
        android:layout_gravity="center"
        android:text="Course code"
        android:textColor="#D6CBD8"
        android:textSize="20dp" />

</androidx.appcompat.widget.LinearLayoutCompat>
Step 8:
Go to the color.xml file and added or modify some color.
App -> res -> values -> color.xml
Color.xml
<?xml version="1.0" encoding="utf-8"?>
<resources>
    <color name="purple_200">#FFBB86FC</color>
    <color name="purple_500">#FF6200EE</color>
    <color name="purple_700">#FF3700B3</color>
    <color name="teal_200">#FF03DAC5</color>
    <color name="teal_700">#FF018786</color>
    <color name="black">#FF000000</color>
    <color name="white">#FFFFFFFF</color>
    <color name="trans">#653F51B5</color>
</resources>
We’ll need some string values for example close navigation and open navigation.
So we’ll add a close and open navigation drawer in the drawable.
App -> res ->values -> strings.xml
Strings.xml
<resources>
    <string name="app_name">Navigation Drawer</string>
    <string name="open">open</string>
    <string name="close">close</string>
</resources>
Lastly, we’ll modify the java file.
Step 9:
Open MainActivity.java and modify.
App -> java -> package -> MainActivity.java
Below code of MainActivity.java
MainActivity.java
package com.pd.NavigationDrawer;

import androidx.annotation.NonNull;
import androidx.appcompat.app.ActionBarDrawerToggle;
import androidx.appcompat.app.AppCompatActivity;
import androidx.appcompat.widget.Toolbar;
import androidx.core.view.GravityCompat;
import androidx.drawerlayout.widget.DrawerLayout;

import android.os.Bundle;
import android.view.MenuItem;
import android.widget.Toast;

import com.google.android.material.navigation.NavigationView;

public class MainActivity extends AppCompatActivity {
    NavigationView nav;
    ActionBarDrawerToggle toggle;
    DrawerLayout drawerLayout;

    @Override
    protected void onCreate(Bundle savedInstanceState) {
        super.onCreate(savedInstanceState);
        setContentView(R.layout.activity_main);

        Toolbar toolbar = (Toolbar) findViewById(R.id.toolbar);
        setSupportActionBar(toolbar);

        nav = (NavigationView) findViewById(R.id.navmenu);
        drawerLayout = (DrawerLayout) findViewById(R.id.drawer);

        toggle = new ActionBarDrawerToggle(this, drawerLayout, toolbar, R.string.open, R.string.close);
        drawerLayout.addDrawerListener(toggle);
        toggle.syncState();

        nav.setNavigationItemSelectedListener(new NavigationView.OnNavigationItemSelectedListener() {
            @Override
            public boolean onNavigationItemSelected(@NonNull MenuItem menuItem) {
                switch (menuItem.getItemId()) {
                    case R.id.menu_home:
                        Toast.makeText(getApplicationContext(), "Home", Toast.LENGTH_LONG).show();
                        drawerLayout.closeDrawer(GravityCompat.START);
                        break;

                    case R.id.menu_share:
                        Toast.makeText(getApplicationContext(), "Share your friends", Toast.LENGTH_LONG).show();
                        drawerLayout.closeDrawer(GravityCompat.START);
                        break;

                    case R.id.menu_setting:
                        Toast.makeText(getApplicationContext(), "Setting", Toast.LENGTH_LONG).show();
                        drawerLayout.closeDrawer(GravityCompat.START);
                        break;
                }

                return true;
            }
        });
    }
}
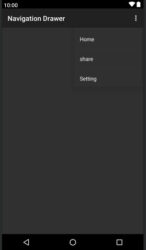
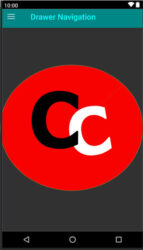
Finally, your navigation drawer app is ready.
Run your app and see the output.
You can see output like as below image.
There Have already made simple navigation drawable
