Android studio pick image from the gallery and camera.
We’ll learn about pick images from the gallery and camera in android studio.
So that will use some dependency.
Also, we will do a cropped image before display it.
but somebody’s mind one question, how to integrate image from gallery or camera in your app.
We shall learn about a select image from the camera and gallery and display it in an image view.
When is it needed?
When you keep the facility to upload an image then it is used.
You know most of the social medial or other apps, we upload a profile picture, when we click on profile picture first ask permission to read and write external storage and camera,
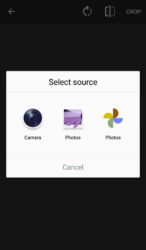
after giving permission, you can pick an image from camera and gallery.
When you select a particular image before setting it to the image view, it asks for a cropped image before setting it to the image view.
For crop, we will use ‘theartofdev’ dependency and call in the main activity.
api 'com.theartofdev.edmodo:android-image-cropper:2.8.+'
For a set image in imageview we will use ‘Picasso‘ dependency and call in the main activity.
implementation 'com.squareup.picasso:picasso:2.5.2'
All work you can do it easily, not so tough.
How to pick an image from a gallery or camera?
follow below step
Step 1:
Open android studio and select ’empty activity’ double click on it or click Next.
Step 2:
Give name your project anything you like.
Also, the package name same as the project name.
Here project name ‘PickImage’ then project package name ‘com.example.pickimage’. project name begins with an uppercase letter.
Then, we’ll set ‘save location’ when we will be the same as our project.
Then, select the language. here given 2 language ‘java’ and ‘kotlin’.
we’ll select ‘java‘.
In this tutorial, we will use ‘java’.
After, select the minimum SDK, that decides how many devices your app to be run.
You can choose the minimum SDK to cover most of the devices. In Android Studio it also shows you approximately how many devices your app will run on.
In this project, we used API 21: Android 5.0(lollipop).
Note: In this project used android version 5 so don’t ask permission. use android 6 or higher for asking permission.
Once you all are done click on finish.
It takes some time to build your project.
Android studio has given default MainActivity and activity_main.xml file.
Now you can start your coding.
Now, we will create simple layout to display image in imageview.
If you don’t know coding android then manually type because practice makes perfect.
activity_main.xml
<?xml version="1.0" encoding="utf-8"?>
<androidx.constraintlayout.widget.ConstraintLayout xmlns:android="http://schemas.android.com/apk/res/android"
    xmlns:app="http://schemas.android.com/apk/res-auto"
    xmlns:tools="http://schemas.android.com/tools"
    android:layout_width="match_parent"
    android:layout_height="match_parent"
    tools:context=".MainActivity">

   <ImageView
       android:id="@+id/pickImage"
       android:layout_width="wrap_content"
       android:layout_height="wrap_content"
       android:src="@drawable/ic_launcher_background"
       app:layout_constraintBottom_toBottomOf="parent"
       app:layout_constraintEnd_toEndOf="parent"
       app:layout_constraintStart_toStartOf="parent"
       app:layout_constraintTop_toTopOf="parent" />
</androidx.constraintlayout.widget.ConstraintLayout>

In the main activity copy and paste the below code.
MainActivity.java
package com.example.pickimage;

import androidx.annotation.NonNull;
import androidx.annotation.Nullable;
import androidx.annotation.RequiresApi;
import androidx.appcompat.app.AppCompatActivity;
import androidx.core.content.ContextCompat;

import android.Manifest;
import android.content.Intent;
import android.content.pm.PackageManager;
import android.net.Uri;
import android.os.Build;
import android.os.Bundle;
import android.view.View;
import android.widget.ImageView;
import android.widget.Toast;

import com.squareup.picasso.Picasso;
import com.theartofdev.edmodo.cropper.CropImage;

public class MainActivity extends AppCompatActivity {
    public ImageView pick;
    public static final int CAMERA_REQUEST = 100;
    public static final int STORAGE_REQUEST = 101;
    String cameraPermission[];
    String storagePermission[];

    @Override
    protected void onCreate(Bundle savedInstanceState) {
        super.onCreate(savedInstanceState);
        setContentView(R.layout.activity_main);
        cameraPermission = new String[]{Manifest.permission.CAMERA, Manifest.permission.WRITE_EXTERNAL_STORAGE};
        storagePermission = new String[]{Manifest.permission.WRITE_EXTERNAL_STORAGE};

        pick = (ImageView) findViewById(R.id.pickImage);
        pick.setOnClickListener(new View.OnClickListener() {
            @RequiresApi(api = Build.VERSION_CODES.M)
            @Override
            public void onClick(View v) {
                int picd = 0;
                if (picd == 0) {
                    if (!checkCameraPermission()) {
                        requestCameraPermission();
                    } else {
                        pickFromGallery();
                    }
                } else if (picd == 1) {
                    if (!checkStoragePermission()) {
                        requestStoragePermission();
                    } else {
                        pickFromGallery();
                    }
                }
            }
        });

    }

    @RequiresApi(api = Build.VERSION_CODES.M)
    private void requestStoragePermission() {
        requestPermissions(storagePermission, STORAGE_REQUEST);
    }

    private boolean checkStoragePermission() {
        boolean result = ContextCompat.checkSelfPermission(this, Manifest.permission.WRITE_EXTERNAL_STORAGE) == (PackageManager.PERMISSION_GRANTED);
        return result;
    }

    private void pickFromGallery() {
        CropImage.activity().start(this);
    }

    @RequiresApi(api = Build.VERSION_CODES.M)
    private void requestCameraPermission() {
        requestPermissions(cameraPermission, CAMERA_REQUEST);
    }

    private boolean checkCameraPermission() {
        boolean result = ContextCompat.checkSelfPermission(this, Manifest.permission.CAMERA) == (PackageManager.PERMISSION_GRANTED);
        boolean result1 = ContextCompat.checkSelfPermission(this, Manifest.permission.WRITE_EXTERNAL_STORAGE) == (PackageManager.PERMISSION_GRANTED);
        return result && result1;
    }

    @Override
    protected void onActivityResult(int requestCode, int resultCode, @Nullable Intent data) {
        super.onActivityResult(requestCode, resultCode, data);
        if (requestCode == CropImage.CROP_IMAGE_ACTIVITY_REQUEST_CODE) {
            CropImage.ActivityResult result = CropImage.getActivityResult(data);
            if (resultCode == RESULT_OK) {
                Uri resultUri = result.getUri();
                Picasso.with(this).load(resultUri).into(pick);
            }
        }
    }

    @Override
    public void onRequestPermissionsResult(int requestCode, @NonNull String[] permissions, @NonNull int[] grantResults) {
        super.onRequestPermissionsResult(requestCode, permissions, grantResults);
        switch (requestCode) {
            case CAMERA_REQUEST: {
                if (grantResults.length > 0) {
                    boolean camera_accepted = grantResults[0] == (PackageManager.PERMISSION_GRANTED);
                    boolean storage_accepted = grantResults[1] == (PackageManager.PERMISSION_GRANTED);
                    if (camera_accepted && storage_accepted) {
                        pickFromGallery();
                    } else {
                        Toast.makeText(this, "Please enable camera and storage permission", Toast.LENGTH_SHORT).show();
                    }
                }

            }
            break;
            case STORAGE_REQUEST: {
                if (grantResults.length > 0) {
                    boolean storage_accepted = grantResults[0] == (PackageManager.PERMISSION_GRANTED);
                    if (storage_accepted) {
                        pickFromGallery();
                    } else {
                        Toast.makeText(this, "Please enable storage permission", Toast.LENGTH_SHORT).show();
                    }
                }
            }
            break;
        }
    }
}
So we recommended typing java code manually for practice otherwise copy and paste.
If you are a beginner, avoid copy and paste as it often comes errors.
Once an error gets you unable to find out it.
In java class we will create some method like
checkCameraPermission();,
requestCamearaPermission();,
checkStoragePermission();,
requestStoragePermission();
why used ‘checkCameraPermission’ and ‘requestCameraPermission’ method ?
this method we used to check camera permission, if you did not give permission, it asks permission using ‘requestCameraPermission method’.
Why used ‘checkStoragePermission’ and ‘requestStoragePermission’ used?
Same as camera permission. For checks storage permission if you did not give permission, it asks before selecting images from the gallery or photos.
and some another given in android studio onActivityResult();, and onRequestPermissionsResult(); by clicking ALT+Insert key in window. Automatically passes the parameter in it.
pickFromGallery();,
MainActivity.java
Now, run your project, click on ‘run.’ Connect your physical device or creating a virtual device.
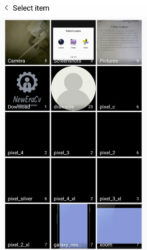
select Image from all available options where you have an image.

Select image from photo

Crop image

Set an image in ImageView

Watch on YouTube

