Why splash screens in apps?
- The splash screen is an intro to your application.
- Most applications have a splash screen.
- The splash screen is nothing but the first screen of the application.
- Starts the application with a splash screen.
- Also, we set time to display a specific time after show’s the second activity.
When you launch the app most of the applications display a splash screen before starting your application.
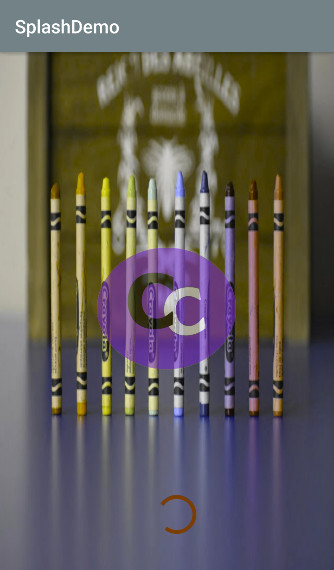
In the splash screen also set logo and loading bar.
How to create a splash screen in android studio?
We will create a splash screen using a handler.
So let’s start creating splash activity in android studio.
Step 1:
Open the android studio.
Step 2:
Select an empty activity and click on ‘Next’
Step 3:
- Write project name whatever you like.
- Set project save location.
- Set minimum SDK, here used API 21 android:5:0(lollipop).
- After, click on ‘finish’.
Now, let us start creating the splash screen application.
- Now, starts building your project. For Gradle build, it takes some time.
- You can see the default MainActivity.java and acticity_main.xml file.
- Now, we will create new activity named anything, whatever you like.
- In the second activity, we’ll choose the default name Main2Activity.
- Here we created two activities is MainActivity.java and Main2Activity.java.
- MainActivity.java is the first activity and Main2Activity.java is the second activity.
- We will create a splash screen MainActivity.java class file and the second activity is Main2Activity.java.
- Now, first we will be creating a UI design in the activity_main.xml file.
- In the activity_main.xml file, you can use logo or loader or both.
- Here used both logo and loader.
The below code is for the activity_main.xml file.
activity_main.xml
<?xml version="1.0" encoding="utf-8"?>
<androidx.constraintlayout.widget.ConstraintLayout xmlns:android="http://schemas.android.com/apk/res/android"
    xmlns:app="http://schemas.android.com/apk/res-auto"
    xmlns:tools="http://schemas.android.com/tools"
    android:layout_width="match_parent"
    android:layout_height="match_parent"
    android:background="@drawable/bg"
    tools:context=".MainActivity">


    <ImageView
        android:id="@+id/imageview"
        android:layout_width="150dp"
        android:layout_height="150sp"
        android:src="@drawable/logo"
        app:layout_constraintBottom_toTopOf="@+id/progressBar"
        app:layout_constraintEnd_toEndOf="parent"
        app:layout_constraintHorizontal_bias="0.498"
        app:layout_constraintStart_toStartOf="parent"
        app:layout_constraintTop_toTopOf="parent"
        app:layout_constraintVertical_bias="0.621" />

    <ProgressBar
        android:id="@+id/progressBar"
        android:layout_width="wrap_content"
        android:layout_height="wrap_content"
        android:layout_marginBottom="36dp"
        app:layout_constraintBottom_toBottomOf="parent"
        app:layout_constraintEnd_toEndOf="parent"
        app:layout_constraintHorizontal_bias="0.534"
        app:layout_constraintStart_toStartOf="parent"></ProgressBar>

</androidx.constraintlayout.widget.ConstraintLayout>
Now, go to the MainActivity.java file and type or copy and paste the code.
MainActivity.java
package com.example.splashdemo;

import androidx.appcompat.app.AppCompatActivity;

import android.content.Intent;
import android.os.Bundle;
import android.os.Handler;
import android.widget.ImageView;

public class MainActivity extends AppCompatActivity {
ImageView imageview;
    @Override
    protected void onCreate(Bundle savedInstanceState) {
        super.onCreate ( savedInstanceState );
        setContentView ( R.layout.activity_main );
imageview=findViewById ( R.id.imageview );
imageview.setAlpha ( 130 );//make image transparent
        new Handler (  ).postDelayed ( new Runnable () {
            @Override
            public void run() {
          startActivity ( new Intent ( MainActivity.this,Main2Activity.class ) );//after go to another activity
            }
        },5000 );//delay time
    }
}
Handler: according to android developer it allows you to send and process Message and Runnable objects associated with a thread’s message queue.
Each handler instance is associate with a single thread and that thread’s message queue. When you create a new handler it is bound to a Looper.
postDelayed(new Runnable())
added message queue run after the specified amount of time.
In simple words, we will set time after time specific time over it redirect to the second screen.
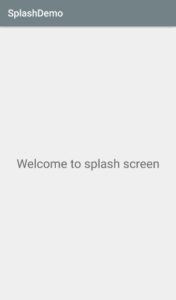
Activity_main.xml file we will set simple message to show when goes to second activity.
Now, create a second empty activity.
Why another activity?
To go to the second activity after the splash screen, so we need another activity otherwise it will spin.
Go to Pack name ⇾ Right-click on the Package name ⇾ New ⇾ Activity ⇾ Empty Activity
give name whatever you like.
Here used the default names Main2Activity.java and activity_main.xml.
activity_main2.xml code
<?xml version="1.0" encoding="utf-8"?>
<LinearLayout xmlns:android="http://schemas.android.com/apk/res/android"
    xmlns:app="http://schemas.android.com/apk/res-auto"
    xmlns:tools="http://schemas.android.com/tools"
    android:layout_width="match_parent"
    android:layout_height="match_parent"
    android:gravity="center"
    tools:context=".Main2Activity">

    <TextView
        android:layout_width="wrap_content"
        android:layout_height="wrap_content"
        android:text="Welcome to splash screen"
        app:layout_constraintBottom_toBottomOf="parent"
        app:layout_constraintEnd_toEndOf="parent"
        app:layout_constraintStart_toStartOf="parent"
        app:layout_constraintTop_toTopOf="parent"
        android:textSize="25sp"></TextView>
</LinearLayout>
Main2Activity.java
package com.example.splashdemo;

import androidx.appcompat.app.AppCompatActivity;

import android.os.Bundle;

public class Main2Activity extends AppCompatActivity {

    @Override
    protected void onCreate(Bundle savedInstanceState) {
        super.onCreate ( savedInstanceState );
        setContentView ( R.layout.activity_main2 );
    }
}

No need to changing AndroidManifest file.

Now run the application.


