In the previous tutorial, sent data to MySQL database using Retrofit in Android Studio.
And now we pull MySQL data into Android recyclerview.
What will we be learning in this tutorial?
Retrieve MySQL data via API.
Android Studio is showing data in a RecyclerView.
How to display MySQL data in Recyclerview?
We will retrieve the data already sent through the API in Android Studio.
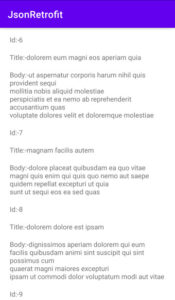
For this, we will retrieve the MySQL data and convert it into JSON form for viewing the data in Android recyclerview.
We have already covered this topic but did not send data through Android Studio but that tutorial sent data through PHP.
In this part, we will retrieve the data that has already been sent through the API in Android Studio.
Let’s get it understood.
Create API to fetch data in local or online server.
We will create a simple API to access the data.
The below code is used to retrieve the data.
<?php
include('config.php');
$query="SELECT *FROM studenttbl";
$result=mysqli_query($con,$query);
if(!$result){
    die(mysqli_error('something wrong try again'));
}
$rows=array();
while($row=mysqli_fetch_assoc($result)){
    array_push($rows,array(
        'id'=>$row['id'],
        'fname'=>$row['fname'],
        'lname'=>$row['lname']));
}
echo json_encode($rows);
mysqli_close($con);
?>
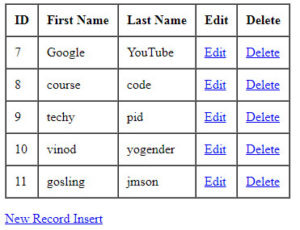
After creating the API, enter the URL into your browser.
You can view the data in JSON format.
Now we are going to show this data in android recyclerview.
How to show PHP MySQL data in Android Recyclerview?
Now, let’s retrieve data using PHP API in Android Studio to show MySQL data in recyclerview.
Here is a step-by-step guide on how to display JSON data in an Android RecyclerView.
Step 1: open previous project
Go to Android Studio and open the previous project that we created in the previous article.
Step 2: new activity
Create a new activity to show MySQL data in new activity on button click.
Because we are displaying MySQL data in the new activity.
Give the new activity name. Here, select the default activity.
Step 3: edit interface class
Edit the interface class and add a ‘GET request’ to retrieve the MySQL data back into the recyclerview.
Replace the below code in the interface.
public interface MyApi {
    @GET("select.php")
        Call<ArrayList<ModelClass>>fetchData();
}
Step 4: edit activity_main2.xml
In step 2, a new activity has already been created.
Now edit activity_main2.xml
Add recyclerview widget in activity_main2.xml.
activity_main2.xml
<?xml version="1.0" encoding="utf-8"?>
<LinearLayout xmlns:android="http://schemas.android.com/apk/res/android"
    xmlns:app="http://schemas.android.com/apk/res-auto"
    xmlns:tools="http://schemas.android.com/tools"
    android:layout_width="match_parent"
    android:layout_height="match_parent"
    tools:context=".MainActivity2">
<androidx.recyclerview.widget.RecyclerView
    android:layout_width="match_parent"
    android:layout_height="match_parent"
    android:id="@+id/rv"/>
</LinearLayout>
Step :5 xml layout resource file
Now, create a single view XML file.
Right click on Layout ⇾ New ⇾ Layout Resource File
Create your own design of whatever data you want to display.
The following code displays a single view XML layout resource file.
Singleview.xml
<?xml version="1.0" encoding="utf-8"?>
<LinearLayout xmlns:android="http://schemas.android.com/apk/res/android"
    android:orientation="vertical" android:layout_width="match_parent"
    android:layout_height="wrap_content">
<TextView
    android:layout_width="match_parent"
    android:layout_height="wrap_content"
    android:id="@+id/fnamet"
    android:textSize="21dp"
    android:text="first name"/>
    <TextView
        android:layout_width="match_parent"
        android:layout_height="wrap_content"
        android:id="@+id/lnamet"
        android:textSize="21dp"
        android:text="last name"/>
</LinearLayout>
Recycle View and Single View are ready.
Step : 6 adapter class
Create MyAdapter named Java class.
The adapter which we are going to set in the second activity so that the data can be shown in the Recyclerview.
Add the following code to the MyAdapter class.
MyAdapter.java
package com.example.mysqldata;

import android.content.Context;
import android.view.LayoutInflater;
import android.view.View;
import android.view.ViewGroup;
import android.widget.TextView;

import androidx.annotation.NonNull;
import androidx.recyclerview.widget.RecyclerView;

import java.util.ArrayList;

public class MyAdapter extends RecyclerView.Adapter<MyAdapter.ViewHolder> {
private ArrayList<ModelClass>arrayList;
private Context context;
private MyApi myApi;

//generate constructor

    public MyAdapter(ArrayList<ModelClass> arrayList, Context context) {
        this.arrayList = arrayList;
        this.context = context;
    }

    @NonNull
    @Override
    public ViewHolder onCreateViewHolder(@NonNull ViewGroup parent, int viewType) {
        View view= LayoutInflater.from(parent.getContext()).inflate(R.layout.singleview,parent,false);
        return new ViewHolder(view);
    }

    @Override
    public void onBindViewHolder(@NonNull ViewHolder holder, int position) {
    ModelClass modelClass=arrayList.get(position);
    holder.fname.setText("First Name:"+modelClass.getFname());
    holder.sname.setText("Last Name:"+modelClass.getLname());
    }

    @Override
    public int getItemCount() {
        return arrayList.size();
    }

    public class ViewHolder extends RecyclerView.ViewHolder {
        TextView fname,sname;
        public ViewHolder(View view) {
            super(view);
            fname=(TextView)view.findViewById(R.id.fnamet);
            sname=(TextView)view.findViewById(R.id.lnamet);
        }
    }
}
Step: 7 edit MainActivity2
Edit the MainActivity2 which is created in step 2.
In MainActivity2.java, we can retrieve data through the PHP API using the Retrofit library and the Retrofit JSON convert library, which we already learned in the previous article.
So that MainActivity2.java. Add the following code.
MainActivity2.java
package com.example.mysqldata;

import androidx.appcompat.app.AppCompatActivity;
import androidx.recyclerview.widget.LinearLayoutManager;
import androidx.recyclerview.widget.RecyclerView;

import android.os.Bundle;
import android.widget.Toast;

import java.util.ArrayList;
import java.util.Base64;

import retrofit2.Call;
import retrofit2.Callback;
import retrofit2.Response;
import retrofit2.Retrofit;
import retrofit2.converter.gson.GsonConverterFactory;

public class MainActivity2 extends AppCompatActivity {
private MyApi myApi;
private MyAdapter myAdapter;
private String BaseUrl="https://androidcode99.000webhostapp.com/student/";
private RecyclerView recyclerView;
private ArrayList<ModelClass>modelClasses;
    @Override
    protected void onCreate(Bundle savedInstanceState) {
        super.onCreate(savedInstanceState);
        setContentView(R.layout.activity_main2);
        modelClasses=new ArrayList<>();
        //initialize id
        recyclerView=findViewById(R.id.rv);
        //create method to show json data in recyclerview
        displayJson();
    }

    private void displayJson() {
        //use retrofit for http request
        Retrofit retrofit=new Retrofit.Builder()
                .baseUrl(BaseUrl)
                .addConverterFactory(GsonConverterFactory.create())
                .build();
        //now call api class
        myApi=retrofit.create(MyApi.class);
        Call<ArrayList<ModelClass>>arrayListCall=myApi.fetchData();
        arrayListCall.enqueue(new Callback<ArrayList<ModelClass>>() {
            @Override
            public void onResponse(Call<ArrayList<ModelClass>> call, Response<ArrayList<ModelClass>> response) {
                modelClasses=response.body();
                //loop for recyclerview item form mysql database
                for(int i=0;i<modelClasses.size();i++){
                //set adapter
                    myAdapter=new MyAdapter(modelClasses,MainActivity2.this);
                    LinearLayoutManager linearLayoutManager=new LinearLayoutManager(MainActivity2.this,RecyclerView.VERTICAL,false);
                    //now set layout
                    recyclerView.setLayoutManager(linearLayoutManager);
                    recyclerView.setAdapter(myAdapter);
                }
            }

            @Override
            public void onFailure(Call<ArrayList<ModelClass>> call, Throwable t) {
                Toast.makeText(MainActivity2.this, "Failed to Load", Toast.LENGTH_SHORT).show();
            }
        });
    }
}
Step :8 activity_main.xml.
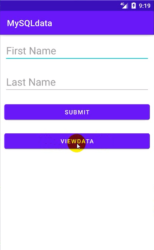
Add View Data button. When you click on the button, you will be redirected to another activity.
<?xml version="1.0" encoding="utf-8"?>
<LinearLayout xmlns:android="http://schemas.android.com/apk/res/android"
    xmlns:app="http://schemas.android.com/apk/res-auto"
    xmlns:tools="http://schemas.android.com/tools"
    android:layout_width="match_parent"
    android:layout_height="match_parent"
    android:orientation="vertical"
    tools:context=".MainActivity">
<Button
    android:layout_width="match_parent"
    android:layout_height="wrap_content"
    android:layout_margin="10dp"
    android:id="@+id/view"
    android:text="ViewData"/>
</LinearLayout>
Step: 9 edit MainActivity.java
In MainActivity.java initialize the button which is created in activity_main.xml file.
 viewdata.setOnClickListener(new View.OnClickListener() {
            @Override
            public void onClick(View view) {
                Intent intent=new Intent(MainActivity.this,MainActivity2.class);
                startActivity(intent);
            }
        });
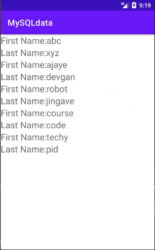
Now when you click on button redirect to another activity. In the second activity, all data is displayed in a recyclerview.
Now launch your app and view the data.
You see the following image.


