Php API, insert data into MySQL database via android.
In this article, we create PHP REST API and will send data via Android. It means get user input by android app and send user input in MySQL server.
What do you learn in this article?
Php API
MySQL database for storing data.
Android to send data to MySQL database.
How to create MySQL database?
First create database in MySQL and then create tables
Create a table in the MySQL database to store the inserted data.
The following code for table.
CREATE TABLE `studenttbl` (
  `id` int(20) NOT NULL,
  `fname` varchar(200) COLLATE utf8_unicode_ci NOT NULL,
  `lname` varchar(200) COLLATE utf8_unicode_ci NOT NULL
) ENGINE=InnoDB DEFAULT CHARSET=utf8 COLLATE=utf8_unicode_ci;
Create database connection file
Create database in MySQL database, next step PHP code. Login online or offline server. Then create a database connection file named config for communication between database and server.
connection file code is given below.
config.php
<?php
$SERVER_NAME='localhost';
$USER_NAME='database_username';
$PASSWORD='password';
$DB_NAME='database_name';
$con=mysqli_connect($SERVER_NAME,$USER_NAME,$PASSWORD,$DB_NAME)or die("could not connect");
?>
How to create simple RESTful API in PHP?
First we can also create our local server like XMPP, WAMP but when you POST data from android studio then you need online server. Because here we have used some library like retrofit 2 for http request.
Create a simple API here for easy understanding.
The PHP code is given below.
<?php
include_once('config.php');
if($_SERVER['REQUEST_METHOD']=='POST'){
    $fname=$_POST['fnamet'];
    $lname=$_POST['lnamet'];
    $query="insert into studenttbl(fname,lname)values('$fname','$lname')";
    $result=mysqli_query($con,$query);
    if(!$result){

        $response["success"]="false";
        $response["message"]="error!";
        echo json_encode($response);
        mysqli_close($con);
    }else{
        $response["success"]="true";
        $response["message"]="success inserted";
        echo json_encode($response);
        mysqli_close($con);
    }
}

?>
After complete API, we need to test API which is working or not, sending data to server or not.
Before using the API, we need to test the API whether it is working or not. If the API is working, then we can use whenever we want. For example, here, we used API in Android Studio to post user input through API. If the API is not tested properly, In case of API failure, the data will not be stored in the database.
How to test API ?
There are many tools to test APIs. Here we are using Postman for API testing. It is simple API testing software. Easily test APIs and use whenever needed.
How to test API using Postman?
You can easily test your API using Postman. Here is the step-by-step process to test the API. To test the API using postman, do the following steps,
Here is the step to check API
Step : 1
Open postman.
Step :2
Select POST
Step :3
Enter URL to check API
Step 4:
Select Body ⇾ form-data
Step :5
Enter your key which you used in API. Like $Name=POST[‘fname’]; here fname is key.
Step :6
After completion, click Send.
If the API is not working then the code needs to be modified, if it works and send the data to the MySQL database then the API is fine.
How to use API in Android Studio?
Now using this API we insert data using android app and send data to online server using retrofit library.
For this
Step :1 android studio
Open android studio.
Step :2 new project
Create a new project and choose Empty Activity.
Step: 3 edit AndroidManifest file
Manifests⇾AndroidManifest.xml
Add internet permission
<uses-permission android:name="android.permission.INTERNET"/>
Step: 4 build.gradle(:app)
Add retrofit2 library and JSON convertor library.
Gradle scripts ⇾build.gradle
implementation 'com.squareup.retrofit2:retrofit:2.9.0'
implementation 'com.squareup.retrofit2:converter-gson:2.9.0'
Step: 5 activity_main.xml
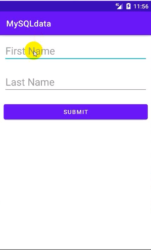
Create UI design in XML file for user input. Here, EditText and Button are used.
The default activity created by default.
The following code shows the xml UI.
<?xml version="1.0" encoding="utf-8"?>
<LinearLayout xmlns:android="http://schemas.android.com/apk/res/android"
    xmlns:app="http://schemas.android.com/apk/res-auto"
    xmlns:tools="http://schemas.android.com/tools"
    android:layout_width="match_parent"
    android:layout_height="match_parent"
    android:orientation="vertical"
    tools:context=".MainActivity">
    <EditText
        android:layout_width="match_parent"
        android:layout_height="wrap_content"
        android:id="@+id/fname"
        android:textSize="24dp"
        android:fontFamily="sans-serif"
        android:layout_margin="10dp"
        android:hint="First Name"/>

    <EditText
        android:layout_margin="10dp"
        android:textSize="24dp"
        android:fontFamily="sans-serif"
        android:layout_width="match_parent"
        android:layout_height="wrap_content"
        android:id="@+id/lname"
        android:hint="Last Name"/>
    <Button
        android:layout_margin="10dp"
        android:layout_width="match_parent"
        android:layout_height="wrap_content"
        android:id="@+id/add"
        android:text="SUBMIT"/>
</LinearLayout>
Step :6 model class
Create a Java class called ModelClass
Right click on package name⇾new⇾java class
The following code shows the ModelClass
package com.example.mysqldata;

public class ModelClass {
    private int id;
    private String fname,lname;
    //generate constructor

    public ModelClass(int id, String fname, String lname) {
        this.id = id;
        this.fname = fname;
        this.lname = lname;
    }
    //generate getter and setter method

    public int getId() {
        return id;
    }

    public void setId(int id) {
        this.id = id;
    }

    public String getFname() {
        return fname;
    }

    public void setFname(String fname) {
        this.fname = fname;
    }

    public String getLname() {
        return lname;
    }

    public void setLname(String lname) {
        this.lname = lname;
    }
}
Step :7 interface
Now create an interface Java class.
Right click on package name⇾new⇾Java class⇾select interface.
Add the following code to the interface class
package com.example.mysqldata;

import java.util.ArrayList;

import retrofit2.Call;
import retrofit2.http.Field;
import retrofit2.http.FormUrlEncoded;
import retrofit2.http.GET;
import retrofit2.http.POST;

public interface MyApi {
    @FormUrlEncoded
    @POST("insert.php")
    Call<ModelClass>insertData(
            @Field("fnamet")String fname,
            @Field("lnamet")String lname
    );
    @GET("select.php")
        Call<ArrayList<ModelClass>>fetchData();
}
ModelClass and Interface class are ready. Now edit MainActivity.java.
Step: 8 MainActivty.java
Declare variables and initialize variables. And then send the request using Retrofit.
package com.example.mysqldata;

import androidx.appcompat.app.AppCompatActivity;

import android.content.Intent;
import android.os.Bundle;
import android.view.View;
import android.widget.Button;
import android.widget.EditText;
import android.widget.Toast;

import retrofit2.Call;
import retrofit2.Callback;
import retrofit2.Response;
import retrofit2.Retrofit;
import retrofit2.converter.gson.GsonConverterFactory;

public class MainActivity extends AppCompatActivity {
private EditText fname,lname;
private Button add;
private MyApi myApi;
private String BaseUrl="https://androidcode99.000webhostapp.com/student/";
    @Override
    protected void onCreate(Bundle savedInstanceState) {
        super.onCreate(savedInstanceState);
        setContentView(R.layout.activity_main);
        fname=(EditText)findViewById(R.id.fname);
        lname=(EditText)findViewById(R.id.lname);
        add=(Button)findViewById(R.id.add);
        add.setOnClickListener(new View.OnClickListener() {
            @Override
            public void onClick(View view) {
                insertData();
            }

            private void insertData() {
                String firstname=fname.getText().toString();
                String lastname=lname.getText().toString();
                Retrofit retrofit=new Retrofit.Builder()
                        .baseUrl(BaseUrl)
                        .addConverterFactory(GsonConverterFactory.create())
                        .build();
                myApi=retrofit.create(MyApi.class);
                Call<ModelClass>modelClassCall=myApi.insertData(firstname,lastname);
                modelClassCall.enqueue(new Callback<ModelClass>() {
                    @Override
                    public void onResponse(Call<ModelClass> call, Response<ModelClass> response) {
                        Toast.makeText(MainActivity.this, "Data successfully inserted", Toast.LENGTH_SHORT).show();
                        fname.setText("");
                        lname.setText("");
                    }

                    @Override
                    public void onFailure(Call<ModelClass> call, Throwable t) {
                        Toast.makeText(MainActivity.this, "Failed to insert", Toast.LENGTH_SHORT).show();
                    }
                });
            }
        });
    }
}
Run your android studio project and insert data.
Your data send to MySQL database via API using Retrofit and JsonConverter.

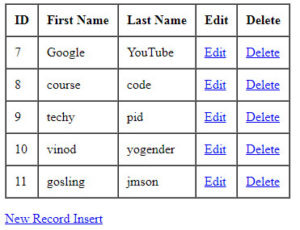
Data successfully inserted into MySQL database from Android app.
Next, we will display data in android recycleview.


