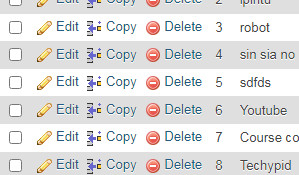
In the early tutorial, we completed the PHP CRUD operation with upload files. We will execute insert query, delete query, update query and display query as well as update image in folder query.
In this article, PHP MySQL data is going to be displayed in Android GridView. You know that in the past tutorial we rendered data in GridView but used SQLite database. In this tutorial, we used the MySQL database.
We did PHP MySQL CRUD now we show data in gridview but instantly doesn’t work because PHP data is not displayed in android gridview. So first we have to convert the JSON format. In the previous tutorial, we had already converted JSON format to Android JSON parsing PHP, showing the data with images in Recyclerview. This is the same tutorial but CRUD operation executed in PHP and now showing data in android gridview with images.
So let’s start PHP MySQL CRUD operation with image and display in gridview.
Step: 1
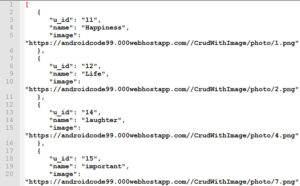
First, we will create a PHP file inside the JSON folder. This folder we created when we did PHP MySQL CRUD operation. Now we return the response in JSON format.
The following code of PHP file to encode the data and get JSON response.
Json.php
<?php
include("../database_conn/config.php");
//select all data from database
$select="SELECT *FROM crud_image";
$result=mysqli_query($conn,$select);
$rows=array();
$folder_name="CrudWithImage";
$image_folder="photo";
$web_url="https://androidcode99.000webhostapp.com/";
$target="$web_url/$folder_name/$image_folder";
while($row=mysqli_fetch_assoc($result)){
    array_push($rows,array(
        'u_id'=>$row['u_id'],
        'name'=>$row['u_name'],
        'image'=>"$target/".$row['u_image']));
}
echo json_encode($rows);
mysqli_close($conn);
?>

This JSON data URL we implemented in our java interface class and java activity for getting HTTP responses from the server-side.
Step: 2
Now starting an android project.
For that, Open Android Studio.
Step: 3
Dependencies
Click on build.gradle and add required dependencies.
App⇾gradle scripts⇾build.gradle(app:module).
Add the following required dependencies.
implementation 'com.squareup.retrofit2:retrofit:2.9.0'
    implementation 'com.squareup.retrofit2:converter-gson:2.9.0'

    implementation'com.squareup.picasso:picasso:2.5.2'
After adding dependencies, don’t forget to “sync” the project.
Step: 4
Permission
We will get data from PHP MySQL database and show data in android gridview. So we have to give internet permission.
Add the following internet permission in the AndroidManifest.xml file.
Manifest⇾AndroidManifest.xml
<uses-permission android:name="android.permission.INTERNET"/>
Step: 5
Go to activity_mian.xml
res⇾layout⇾activity_main.xml
The following code is activity_main.xml
Activity_main.xml
<?xml version="1.0" encoding="utf-8"?>
<RelativeLayout xmlns:android="http://schemas.android.com/apk/res/android"
    xmlns:app="http://schemas.android.com/apk/res-auto"
    xmlns:tools="http://schemas.android.com/tools"
    android:layout_width="match_parent"
    android:layout_height="match_parent"
    tools:context=".MainActivity">
<androidx.swiperefreshlayout.widget.SwipeRefreshLayout
    android:layout_width="match_parent"
    android:layout_height="match_parent"
    android:id="@+id/refresh">
    <androidx.recyclerview.widget.RecyclerView
        android:layout_width="match_parent"
        android:layout_height="match_parent"
        android:id="@+id/rv"/>
</androidx.swiperefreshlayout.widget.SwipeRefreshLayout>
</RelativeLayout>
In the above code, we added swipeRefreshLayout to refresh the recycler activity after adding a new record to the PHP MySQL database.
Step: 6
Now create a new XML file for a single record.
Res⇾layout⇾new⇾layout resource file.
The code for single data is given below
Singleview.xml
<?xml version="1.0" encoding="utf-8"?>
<LinearLayout xmlns:android="http://schemas.android.com/apk/res/android"
    xmlns:app="http://schemas.android.com/apk/res-auto"
    android:orientation="vertical"
    android:layout_width="match_parent"
    android:layout_height="wrap_content">
<LinearLayout
    android:layout_width="match_parent"
    android:layout_height="match_parent"
    android:orientation="vertical">
    <androidx.cardview.widget.CardView
        android:layout_width="match_parent"
        android:layout_height="match_parent"
        app:cardElevation="5dp"
        app:cardUseCompatPadding="true"
        app:cardCornerRadius="20dp">
        <ImageView
            android:layout_gravity="center_horizontal"
            android:src="@drawable/ic_launcher_background"
            android:layout_width="wrap_content"
            android:layout_height="wrap_content"
            android:id="@+id/imagev"/>
        <TextView
            android:id="@+id/name"
            android:layout_width="match_parent"
            android:layout_height="wrap_content"
            android:text="@string/app_name"
            android:layout_gravity="bottom"
            android:gravity="center_horizontal"
            android:textSize="25dp"/>
    </androidx.cardview.widget.CardView>
</LinearLayout>
</LinearLayout>
In the above code, cardview widget is used for better UI design.
Our UI design is finished. Now we implement the Java Activity.
Step: 7
Interface
Create a new Java interface class to get JSON responses.
Java⇾right click on package name⇾new⇾java class, give name and select interface
The following code interface class
MyApi.java
package com.example.gridimage;

import java.util.ArrayList;

import retrofit2.Call;
import retrofit2.http.GET;

interface MyApi {
    @GET("json.php")
    Call<ArrayList<Model>>callModel();
}
Step: 8
Model class
To store the records, create a Java class named model.
Java⇾right click on package name⇾new class
The following code of the Model class
Model.java
package com.example.gridimage;

import com.google.gson.annotations.SerializedName;

class Model {
    private int u_id;
    @SerializedName ( "name" )
    private String name;
    @SerializedName ( "image" )
    private String image;
    //generate constructor

    public Model(int u_id, String name, String image) {
        this.u_id = u_id;
        this.name = name;
        this.image = image;
    }
    //getter qand setter method

    public int getU_id() {
        return u_id;
    }

    public void setU_id(int u_id) {
        this.u_id = u_id;
    }

    public String getName() {
        return name;
    }

    public void setName(String name) {
        this.name = name;
    }

    public String getImage() {
        return image;
    }

    public void setImage(String image) {
        this.image = image;
    }
}
In the above code, @serializedName annotation is used, which is used when different strings in java fields and JSON take different names, at that time we have implemented @serializedName annotation.
But here both Java String and JSON are used the same name.
Step: 9
Adapter class
Now create an adapter class to view each record in the data set. Here, the Adapter class is used to view each record in our Recycler GridView. Via the Adapter class.
The code for the Adapter class is given below.
MyAdapter.java
package com.example.gridimage;


import android.content.Context;
import android.view.LayoutInflater;
import android.view.View;
import android.view.ViewGroup;
import android.widget.ImageView;
import android.widget.TextView;

import androidx.annotation.NonNull;
import androidx.recyclerview.widget.RecyclerView;

import com.squareup.picasso.Picasso;

import java.util.ArrayList;

class MyAdapter extends RecyclerView.Adapter<MyAdapter.ViewHolder> {
    private ArrayList<Model>modelArrayList;
    private Context context;
    //generate constructor

    public MyAdapter(ArrayList<Model> modelArrayList, Context context) {
        this.modelArrayList = modelArrayList;
        this.context = context;
    }

    @NonNull
    @Override
    public MyAdapter.ViewHolder onCreateViewHolder(@NonNull ViewGroup parent, int viewType) {
        View view= LayoutInflater.from ( parent.getContext () ).inflate ( R.layout.singleview,parent,false );
        return new ViewHolder ( view );
    }

    @Override
    public void onBindViewHolder(@NonNull MyAdapter.ViewHolder holder, int position) {
Model model=modelArrayList.get ( position );
//for image
        Picasso.with ( context ).load ( model.getImage () ).into ( holder.imageView );
        //for textview
        holder.textView.setText ( model.getName () );
    }

    @Override
    public int getItemCount() {
        return modelArrayList.size ();
    }

    public class ViewHolder extends RecyclerView.ViewHolder {
        TextView textView;
        ImageView imageView;
        public ViewHolder(@NonNull View itemView) {
            super ( itemView );
            textView=itemView.findViewById ( R.id.name );
            imageView=itemView.findViewById ( R.id.imagev );
        }
    }
}
Step: 10
MainActivity
Go to MainActivity.java and add the following code.
MainActiviy.java
package com.example.gridimage;

import androidx.appcompat.app.AppCompatActivity;
import androidx.recyclerview.widget.GridLayoutManager;
import androidx.recyclerview.widget.RecyclerView;
import androidx.swiperefreshlayout.widget.SwipeRefreshLayout;

import android.os.Bundle;
import android.os.Handler;
import android.widget.Toast;

import java.util.ArrayList;

import retrofit2.Call;
import retrofit2.Callback;
import retrofit2.Response;
import retrofit2.Retrofit;
import retrofit2.converter.gson.GsonConverterFactory;

public class MainActivity extends AppCompatActivity {
MyAdapter myAdapter;
MyApi myApi;
String Baseurl="https://androidcode99.000webhostapp.com/CrudWithImage/json/";
ArrayList<Model>modelArrayList;
RecyclerView recyclerView;
SwipeRefreshLayout swipeRefreshLayout;
    @Override
    protected void onCreate(Bundle savedInstanceState) {
        super.onCreate ( savedInstanceState );
        setContentView ( R.layout.activity_main );
        modelArrayList=new ArrayList<> ();
        findId();
        disJson();
        refreshSwipe();
    }

    private void refreshSwipe() {
        swipeRefreshLayout.setOnRefreshListener ( new SwipeRefreshLayout.OnRefreshListener () {
            @Override
            public void onRefresh() {
                afterRef();
                new Handler ().postDelayed ( new Runnable () {
                    @Override
                    public void run() {
                        swipeRefreshLayout.setRefreshing ( false );
                    }
                },3000 );
            }
        } );
    }

    private void afterRef() {
        disJson ();
    }

    private void disJson() {
        Retrofit retrofit=new Retrofit.Builder ()
                .baseUrl ( Baseurl )
                .addConverterFactory ( GsonConverterFactory.create () )
                .build ();
        myApi=retrofit.create ( MyApi.class );
        Call<ArrayList<Model>>listCall=myApi.callModel ();
        listCall.enqueue ( new Callback<ArrayList<Model>> () {
            @Override
            public void onResponse(Call<ArrayList<Model>> call, Response<ArrayList<Model>> response) {
                modelArrayList=response.body ();
                for (int i=0;i<modelArrayList.size ();i++){
                    //set adapter
                    myAdapter=new MyAdapter ( modelArrayList,MainActivity.this );
                    //set gridlayout
                    GridLayoutManager gridLayoutManager=new GridLayoutManager ( MainActivity.this,2 );
                    //set layout
                    recyclerView.setLayoutManager ( gridLayoutManager );
                    recyclerView.setAdapter ( myAdapter );
                }
            }

            @Override
            public void onFailure(Call<ArrayList<Model>> call, Throwable t) {
                //show toast is data does not load
                Toast.makeText ( MainActivity.this, "failed to load", Toast.LENGTH_SHORT ).show ();
            }
        } );
    }

    private void findId() {
        recyclerView=findViewById ( R.id.rv );
        swipeRefreshLayout=findViewById ( R.id.refresh );
    }
}
In the code, whenever we add a new record and then refresh the gridview activity, you can do a swipe to refresh functionality for the refreshed data.
Hope you have done everything very well.
Now, it’s time to run our application.
You can see output like below.

Note: In this post, if you find any mistakes or bugs and errors, feel free to contact or give feedback to improve the quality. Great if you give your feedback about this tutorial and other tutorials.


